Introduction to Vampire Bite Red Velvet Cheesecake
As the leaves turn and the air gets crisp, I find myself craving something a little spooky yet utterly delicious. Enter the Vampire Bite Red Velvet Cheesecake! This dessert is not just a feast for the eyes; it’s a delightful blend of rich flavors that will make your taste buds dance. Perfect for Halloween gatherings or a cozy night in, this cheesecake is a quick solution for impressing friends and family alike. Trust me, once you serve this beauty, everyone will be begging for a slice of your “vampire’s midnight treat!”
Why You’ll Love This Vampire Bite Red Velvet Cheesecake
This Vampire Bite Red Velvet Cheesecake is a showstopper that’s surprisingly easy to make. With its velvety texture and rich flavor, it’s a dessert that will leave your guests in awe. Plus, it’s perfect for any Halloween celebration or cozy gathering. The best part? You can whip it up in just a few simple steps, making it a delightful treat without the fuss. Who wouldn’t love that?
Ingredients for Vampire Bite Red Velvet Cheesecake
Gathering the right ingredients is the first step to creating this spooky delight. Here’s what you’ll need:
- Oreo cookies: These crushed cookies form a deliciously rich crust that adds a chocolatey crunch.
- Unsalted butter: Melted butter binds the crust together, giving it a smooth texture.
- Granulated sugar: A touch of sweetness enhances the crust and balances the cheesecake’s richness.
- Cream cheese: The star of the show! Softened cream cheese creates that creamy, dreamy filling.
- Granulated sugar: This sweetener is also used in the filling to achieve the perfect balance of flavors.
- Unsweetened cocoa powder: Adds a hint of chocolate flavor, complementing the red velvet beautifully.
- Sour cream: This ingredient contributes to the cheesecake’s tangy flavor and creamy texture.
- Eggs: Room temperature eggs help bind the filling and create a smooth consistency.
- Red food coloring: Gel food coloring is preferred for its vibrant hue, giving the cheesecake its signature red color.
- Vanilla extract: A splash of vanilla enhances the overall flavor, making it even more delightful.
- All-purpose flour: Just a bit helps stabilize the filling, ensuring it sets perfectly.
- Salt: A pinch of salt balances the sweetness and enhances the flavors.
- Seedless raspberry or strawberry jam: This warm jam creates a glossy “blood” effect on top, adding a fun Halloween twist.
- Chocolate syrup: Drizzled on top, it adds a decorative touch and extra sweetness.
For exact measurements, check the bottom of the article where you can find everything listed for easy printing. Happy baking!
How to Make Vampire Bite Red Velvet Cheesecake
Step 1: Preheat and Prepare the Crust
First things first, let’s get that oven preheating to 325°F (160°C). While it warms up, grab your Oreo cookies and crush them into fine crumbs. I like to use a food processor, but a good old-fashioned rolling pin works too! In a bowl, mix the crushed cookies with melted butter and a tablespoon of sugar until it resembles wet sand. Press this mixture firmly into the bottom of a 9-inch springform pan. This crust is the foundation of your Vampire Bite Red Velvet Cheesecake, so make sure it’s nice and compact. Bake it for 10 minutes, then set it aside to cool.
Step 2: Make the Cheesecake Filling
Now, let’s whip up that luscious filling! In a large mixing bowl, beat the softened cream cheese until it’s smooth and fluffy. This step is crucial; you want it to be airy and light. Gradually add in the granulated sugar and cocoa powder, mixing until well combined. Next, stir in the sour cream, followed by the eggs—one at a time. This helps keep the mixture smooth. Don’t forget the vanilla extract, flour, salt, and that vibrant red food coloring! Mix until everything is well blended and you have a velvety red batter. Pour this beautiful filling over your cooled crust, and get ready for the magic to happen!
Step 3: Bake the Cheesecake
Time to bake! Place your springform pan inside a larger roasting pan. This is where the water bath comes in. Fill the roasting pan with hot water until it reaches halfway up the sides of the springform pan. This method helps prevent cracks in your cheesecake. Bake for 55 to 65 minutes. You’ll know it’s done when the edges are set, but the center still has a slight jiggle. Once baked, turn off the oven, crack the door open, and let the cheesecake rest inside for an hour. This gentle cooling helps it set perfectly. After that, remove it from the oven and let it cool completely before refrigerating for at least 4 hours, or overnight if you can wait!
Step 4: Chill and Decorate
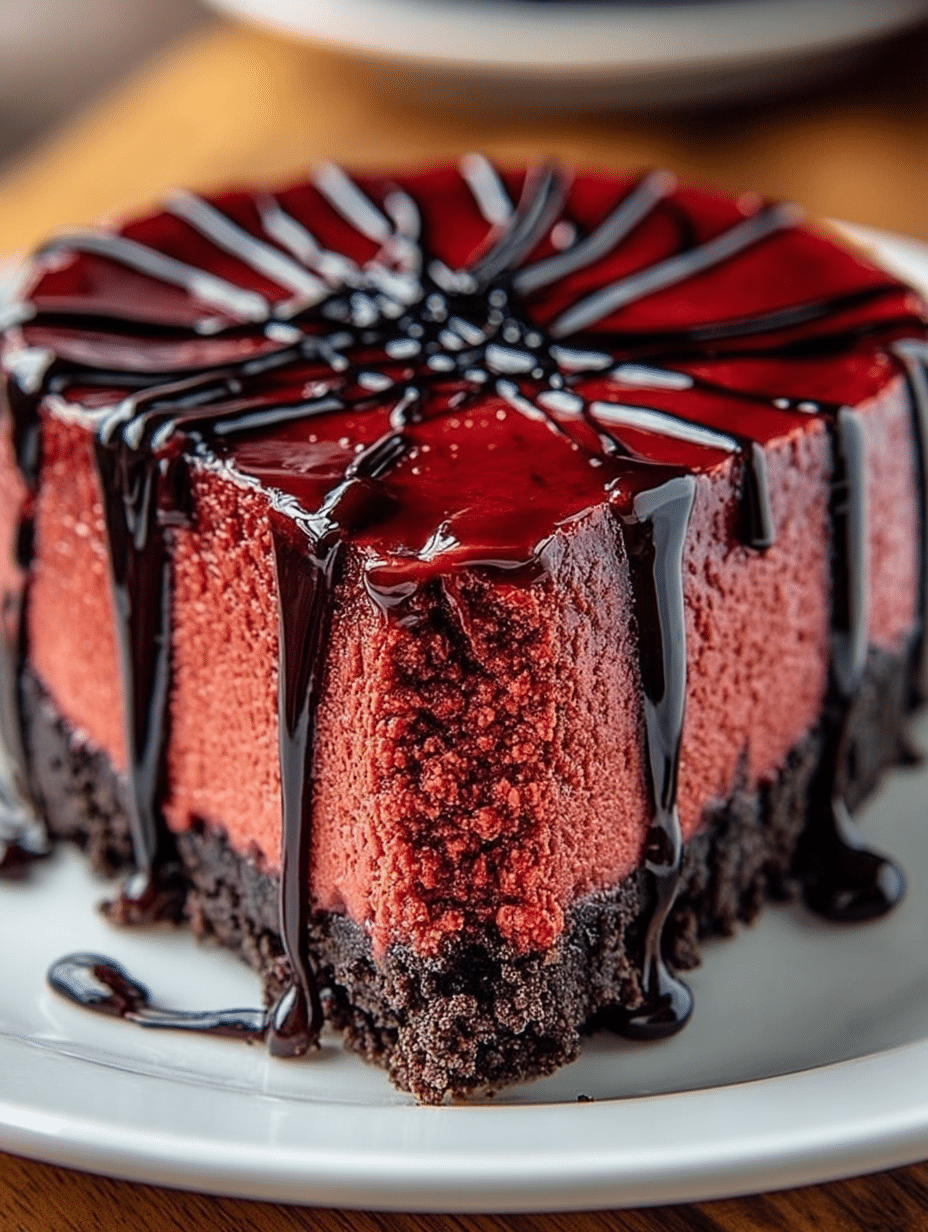
Once your cheesecake is chilled and ready to go, it’s time for the fun part—decorating! Warm up your seedless raspberry or strawberry jam slightly and drizzle it over the top for that glossy “blood” effect. Then, take your chocolate syrup and pipe or drizzle it in a spiderweb or dripping pattern. This adds a spooky touch that’s perfect for Halloween. Slice it up, and serve each piece as a delightful vampire’s midnight treat!
Tips for Success
- Always use room temperature ingredients for a smoother batter.
- Don’t skip the water bath; it prevents cracks and keeps the cheesecake moist.
- Let the cheesecake chill overnight for the best flavor and texture.
- Use gel food coloring for a more vibrant red hue.
- Experiment with different toppings like crushed cookies or fresh berries!
Equipment Needed
- 9-inch springform pan: Essential for easy removal; a regular cake pan works too, but it may be tricky to serve.
- Mixing bowls: Use a large bowl for the filling; any size will do.
- Electric mixer: A hand mixer is great, but a stand mixer saves time.
- Food processor or rolling pin: For crushing Oreos; either will get the job done!
- Roasting pan: Needed for the water bath; a large baking dish can work as an alternative.
Variations
- Gluten-Free: Substitute regular Oreo cookies with gluten-free cookies to make the crust gluten-free.
- Chocolate Lovers: Add chocolate chips to the cheesecake filling for an extra chocolatey kick.
- Fruit Twist: Incorporate pureed raspberries or strawberries into the filling for a fruity flavor.
- Vegan Option: Use vegan cream cheese and a flaxseed egg substitute for a plant-based version.
- Spiced Up: Add a pinch of cinnamon or nutmeg to the filling for a warm, spiced flavor.
Serving Suggestions
- Pair with a scoop of vanilla ice cream for a creamy contrast.
- Serve alongside fresh berries for a pop of color and freshness.
- Complement with a glass of red wine or a spooky Halloween punch.
- Garnish with mint leaves for a touch of elegance.
- Present on a decorative platter for a festive look!
FAQs about Vampire Bite Red Velvet Cheesecake
Can I make Vampire Bite Red Velvet Cheesecake ahead of time?
Absolutely! In fact, making it a day in advance is ideal. This allows the flavors to meld beautifully and ensures a perfect texture. Just keep it covered in the fridge until you’re ready to serve.
What can I use instead of cream cheese?
If you’re looking for a substitute, you can try using mascarpone cheese or a vegan cream cheese alternative. Both will give you a creamy texture, but the flavor may vary slightly.
How do I store leftovers?
Store any leftover Vampire Bite Red Velvet Cheesecake in an airtight container in the refrigerator. It should stay fresh for about 3 to 5 days. Just be prepared for the temptation to finish it all in one sitting!
Can I freeze the cheesecake?
Yes, you can freeze it! Wrap the cheesecake tightly in plastic wrap and then in aluminum foil. It can be frozen for up to 2 months. Just remember to thaw it in the fridge overnight before serving.
What’s the best way to cut the cheesecake?
To get clean slices, use a sharp knife dipped in hot water. Wipe the knife clean between cuts for that perfect presentation. Your guests will be impressed with those neat slices!
Final Thoughts
Creating this Vampire Bite Red Velvet Cheesecake is more than just baking; it’s about crafting a delightful experience that brings joy to your kitchen and your loved ones. The vibrant red color and spooky decorations make it a perfect centerpiece for any Halloween gathering. Each slice is a delicious reminder of the fun and creativity that comes with cooking. So, whether you’re hosting a party or enjoying a cozy night in, this cheesecake is sure to impress. Dive into this culinary adventure, and let the flavors and festive spirit sweep you away!
Print
Vampire Bite Red Velvet Cheesecake: A Spooky Delight!
- Total Time: 4 hours 35 minutes (including chilling time)
- Yield: 12 servings 1x
- Diet: Vegetarian
Description
A spooky and delicious Vampire Bite Red Velvet Cheesecake that combines the rich flavors of red velvet with a fun Halloween twist.
Ingredients
- 24 Oreo cookies (crushed into fine crumbs)
- 5 tbsp unsalted butter, melted
- 1 tbsp granulated sugar
- 24 oz (680 g) cream cheese, softened
- 1 cup (200 g) granulated sugar
- 3 tbsp unsweetened cocoa powder
- 1 cup (240 g) sour cream, room temperature
- 3 large eggs, room temperature
- 1 tbsp red food coloring (gel preferred for intensity)
- 2 tsp vanilla extract
- 1 tbsp all-purpose flour
- Pinch of salt
- ½ cup seedless raspberry or strawberry jam (warmed slightly)
- 2 tbsp chocolate syrup
Instructions
- Preheat oven to 325°F (160°C).
- Mix crushed Oreos, melted butter, and sugar until combined. Press firmly into the bottom of a 9-inch springform pan. Bake for 10 minutes, then set aside.
- In a large mixing bowl, beat cream cheese until smooth and fluffy. Add sugar and cocoa powder, mixing until combined. Mix in sour cream, eggs (one at a time), vanilla, flour, salt, and food coloring until batter is velvety red. Pour filling over the cooled crust.
- Place the pan in a larger roasting pan. Fill roasting pan with hot water halfway up the sides (water bath method to prevent cracks). Bake for 55–65 minutes, until edges are set but center is slightly jiggly. Turn off oven, crack the door, and let cheesecake rest inside for 1 hour. Remove from oven, let cool completely, then refrigerate at least 4 hours or overnight.
- Once chilled, drizzle warmed raspberry jam on top for a glossy “blood” effect. Pipe or drizzle chocolate syrup in a spiderweb or dripping pattern. Slice and serve — each piece looks like a vampire’s midnight treat!
Notes
- For best results, use room temperature ingredients.
- Gel food coloring provides a more vibrant color than liquid food coloring.
- Allow the cheesecake to chill overnight for the best texture and flavor.
- Prep Time: 30 minutes
- Cook Time: 1 hour 5 minutes
- Category: Dessert
- Method: Baking
- Cuisine: American
Nutrition
- Serving Size: 1 slice
- Calories: 350
- Sugar: 25g
- Sodium: 300mg
- Fat: 22g
- Saturated Fat: 12g
- Unsaturated Fat: 8g
- Trans Fat: 0g
- Carbohydrates: 30g
- Fiber: 1g
- Protein: 5g
- Cholesterol: 90mg


