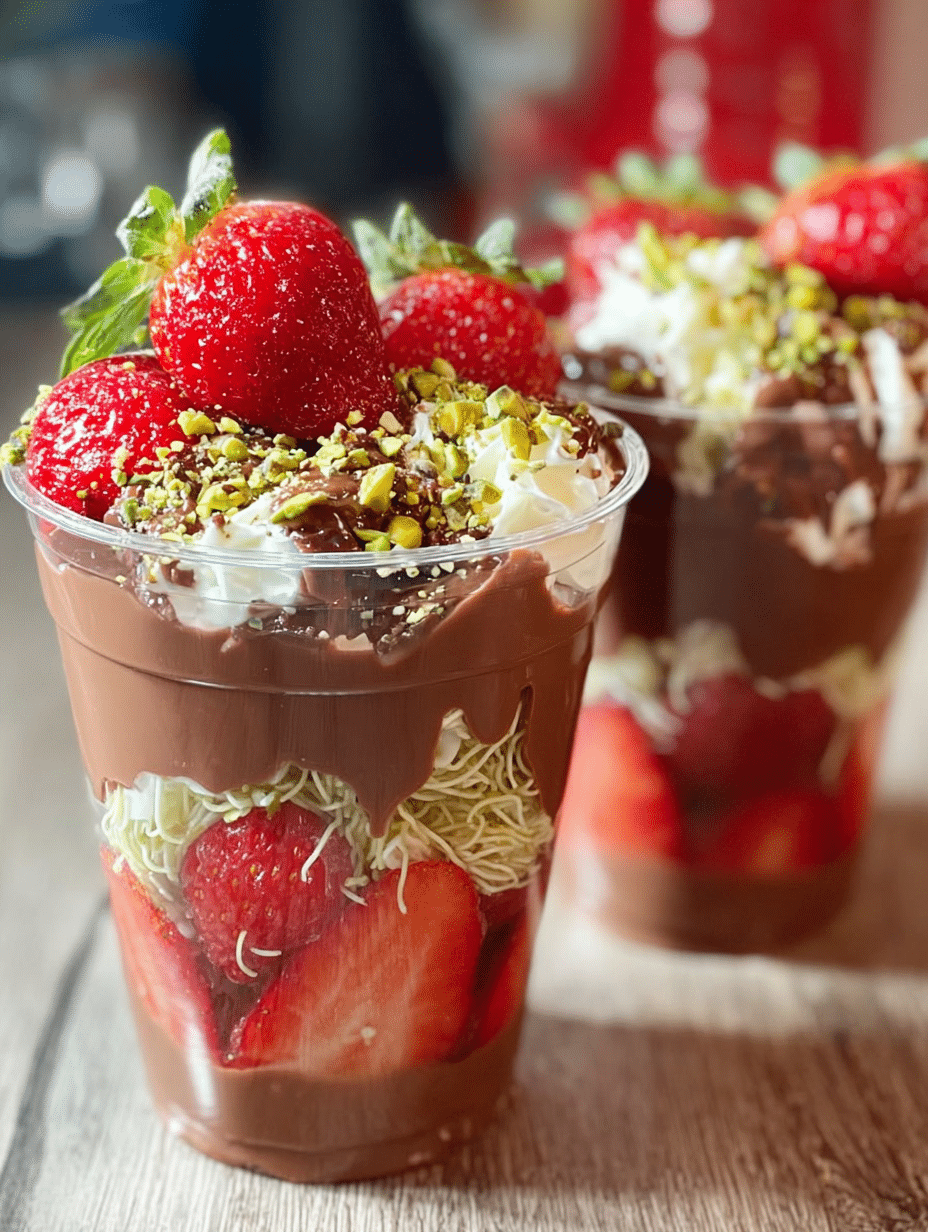
Introduction to Strawberry Pistachio Chocolate Cups
Hey there, fellow food lovers! If you’re looking for a delightful treat that’s as easy to make as it is delicious, you’ve landed in the right spot. Let me introduce you to my Strawberry Pistachio Chocolate Cups. These little gems are perfect for impressing guests or simply indulging yourself after a long day. With the sweetness of strawberries, the crunch of pistachios, and the richness of chocolate, they’re a symphony of flavors in every bite. Plus, they’re no-bake, making them a quick solution for busy days when you crave something special!
Why You’ll Love This Strawberry Pistachio Chocolate Cups
These Strawberry Pistachio Chocolate Cups are a dream come true for any home cook. They come together in just 30 minutes, making them a fantastic last-minute dessert. The combination of fresh strawberries and crunchy pistachios creates a delightful texture that dances on your palate. Plus, they’re customizable! Whether you prefer milk or dark chocolate, you can easily adapt this recipe to suit your taste. Trust me, your loved ones will be begging for seconds!
Ingredients for Strawberry Pistachio Chocolate Cups
Let’s gather our ingredients for these delightful Strawberry Pistachio Chocolate Cups! Each component plays a vital role in creating that perfect balance of flavors and textures.
- Milk or Dark Chocolate: This is the star of the show! Choose your favorite type for a rich, creamy base.
- Fresh Strawberries: Sweet and juicy, they add a burst of freshness. Halve or slice them for a beautiful presentation.
- Kataifi Pastry: This optional ingredient brings a unique crunch. If you can’t find it, shredded phyllo or even crushed cookies work well too!
- Whipped Cream: Sweetened whipped cream adds a light, airy layer. You can make your own or use store-bought for convenience.
- Pistachios: Chopped pistachios provide a nutty crunch and a pop of color. They’re also a great source of healthy fats!
- Whole Strawberries: These are for garnish, giving your cups a stunning finish that’s sure to impress.
For exact measurements, check the bottom of the article where you can find everything listed for easy printing. Now, let’s get ready to create some magic in the kitchen!
How to Make Strawberry Pistachio Chocolate Cups
Now that we have our ingredients ready, let’s dive into the fun part—making these Strawberry Pistachio Chocolate Cups! Follow these simple steps, and you’ll be on your way to a delicious dessert that’s sure to impress.
Step 1: Melt the Chocolate
Start by melting your chocolate. You can use a double boiler for this, which is my preferred method. Just fill a pot with water, bring it to a simmer, and place a heatproof bowl on top. Add your chocolate and stir until it’s smooth and glossy. If you’re short on time, the microwave works too! Just heat it in 20-second intervals, stirring in between to avoid burning. Remember, patience is key here!
Step 2: Prepare the Cups
Once your chocolate is melted, it’s time to prepare the cups. Pour a spoonful of the melted chocolate into each cup. Use the back of a spoon to swirl it around, coating the bottom and sides evenly. This creates a lovely shell for your dessert. Let it set slightly at room temperature while you move on to the next step.
Step 3: Add Strawberries
Now for the fun part—adding the strawberries! Take your halved strawberries and gently press them against the inside walls of the chocolate cups. This not only looks beautiful but also adds a burst of flavor with every bite. Make sure to arrange them nicely for that layered look!
Step 4: Incorporate Crunch
To add some texture, sprinkle a small handful of shredded kataifi pastry into each cup. This gives a delightful crunch that contrasts beautifully with the smooth chocolate and creamy layers. If you can’t find kataifi, don’t worry! Shredded phyllo or even crushed cookies work just as well.
Step 5: Layer with Whipped Cream
Next, it’s time to add a layer of whipped cream. You can either pipe it in for a fancy touch or simply spoon it over the pastry layer. This light, airy layer adds a wonderful creaminess that balances the richness of the chocolate. Don’t be shy—make it a generous layer!
Step 6: Final Chocolate Layer
Now, pour more melted chocolate over the whipped cream to cover and bind all the layers together. This will create a beautiful, cohesive dessert. Make sure to smooth it out so it looks nice and even. You want every bite to be a perfect blend of flavors!
Step 7: Garnish and Chill
Finally, it’s time to garnish! Add some swirls of whipped cream on top, sprinkle with chopped pistachios for that nutty crunch, and place a whole fresh strawberry in the center for a stunning finish. Now, pop your cups in the refrigerator for about 20–30 minutes to let everything set. Trust me, the wait will be worth it!
Tips for Success
- Use high-quality chocolate for the best flavor. It makes a world of difference!
- Let the chocolate cool slightly before pouring to avoid melting the strawberries.
- Experiment with different toppings like crushed cookies or nuts for variety.
- Make these cups a few hours ahead for a stress-free dessert.
- Don’t skip the chilling step; it helps the layers set beautifully!
Equipment Needed
- Heatproof Bowl: For melting chocolate. A glass bowl works great!
- Double Boiler or Microwave: Use either method to melt chocolate smoothly.
- Measuring Cups: Essential for accurate ingredient portions.
- Spoon or Piping Bag: For layering whipped cream.
- Refrigerator: To chill and set your delicious cups.
Variations of Strawberry Pistachio Chocolate Cups
- Dark Chocolate Delight: Swap milk chocolate for dark chocolate for a richer, more intense flavor.
- Nut-Free Option: Omit the pistachios and use sunflower seeds or pumpkin seeds for a nut-free alternative.
- Vegan Version: Use dairy-free chocolate and coconut whipped cream to make these cups vegan-friendly.
- Fruit Fusion: Experiment with other fruits like raspberries or blueberries for a different fruity twist.
- Cookie Crust: Instead of kataifi, use crushed graham crackers or Oreos for a sweet cookie base.
Serving Suggestions
- Pair these Strawberry Pistachio Chocolate Cups with a scoop of vanilla ice cream for a delightful contrast.
- Serve alongside a refreshing mint tea or a glass of sparkling water to cleanse the palate.
- For a stunning presentation, arrange the cups on a colorful platter with fresh mint leaves.
- Consider drizzling some chocolate sauce over the top for an extra touch of indulgence.
FAQs about Strawberry Pistachio Chocolate Cups
As I’ve shared my love for these Strawberry Pistachio Chocolate Cups, I know you might have a few questions. Let’s dive into some common queries to help you create the perfect dessert!
Can I make Strawberry Pistachio Chocolate Cups in advance?
Absolutely! These cups can be made a few hours ahead of time. Just store them in the refrigerator until you’re ready to serve. They’ll be just as delicious!
What can I substitute for kataifi pastry?
If you can’t find kataifi pastry, don’t fret! Shredded phyllo or even crushed cookies work wonderfully as alternatives, adding that delightful crunch.
Can I use frozen strawberries instead of fresh?
While fresh strawberries are best for flavor and texture, you can use frozen ones. Just make sure to thaw and drain them well to avoid excess moisture.
How do I store leftover Strawberry Pistachio Chocolate Cups?
Store any leftovers in an airtight container in the refrigerator. They should stay fresh for up to two days, but trust me, they won’t last long!
Can I customize the toppings for these cups?
Definitely! Feel free to get creative with your toppings. You can use different nuts, fruits, or even a drizzle of caramel for a unique twist on these Strawberry Pistachio Chocolate Cups.
Final Thoughts
Creating these Strawberry Pistachio Chocolate Cups is more than just making a dessert; it’s about crafting a moment of joy. Each layer tells a story, from the rich chocolate to the fresh strawberries and crunchy pistachios. I love how this recipe brings people together, whether it’s a cozy family dinner or a gathering with friends. The smiles on their faces as they take that first bite? Priceless! So, roll up your sleeves, gather your ingredients, and let the magic unfold in your kitchen. Trust me, you’ll be savoring every delicious moment!
Print
Strawberry Pistachio Chocolate Cups: Delight in This Easy Recipe!
- Total Time: 30 minutes
- Yield: 4 cups 1x
- Diet: Vegetarian
Description
Delight in these Strawberry Pistachio Chocolate Cups, a delicious and easy-to-make dessert that combines the sweetness of strawberries, the crunch of pistachios, and the richness of chocolate.
Ingredients
- 250 g (9 oz) milk chocolate (or dark chocolate, melted)
- 200 g fresh strawberries (halved or sliced)
- ½ cup unsweetened shredded kataifi pastry (or shredded phyllo, optional for texture)
- ½ cup whipped cream (sweetened)
- ¼ cup chopped pistachios
- Whole strawberries (for garnish)
Instructions
- Melt the chocolate using a double boiler or microwave in 20-second intervals, stirring until smooth.
- Pour a spoonful of melted chocolate into each cup, swirling to coat the bottom and sides. Let it set slightly.
- Place halved strawberries along the inside walls of the cup for a pretty layered look.
- Add a small handful of shredded kataifi pastry (if using) to create crunch.
- Pipe or spoon a layer of whipped cream over the pastry.
- Pour more melted chocolate to cover and bind the layers.
- Add whipped cream swirls on top.
- Sprinkle generously with chopped pistachios.
- Place a whole fresh strawberry in the center for a show-stopping finish.
- Refrigerate cups for 20–30 minutes to let the layers set.
- Serve chilled, directly from the cups.
Notes
- For a richer flavor, use dark chocolate instead of milk chocolate.
- Feel free to substitute the kataifi pastry with crushed cookies for a different texture.
- These cups can be made a few hours in advance and stored in the refrigerator until serving.
- Prep Time: 20 minutes
- Cook Time: 10 minutes
- Category: Dessert
- Method: No-Bake
- Cuisine: International
Nutrition
- Serving Size: 1 cup
- Calories: 350
- Sugar: 25g
- Sodium: 50mg
- Fat: 20g
- Saturated Fat: 10g
- Unsaturated Fat: 8g
- Trans Fat: 0g
- Carbohydrates: 40g
- Fiber: 2g
- Protein: 5g
- Cholesterol: 15mg


