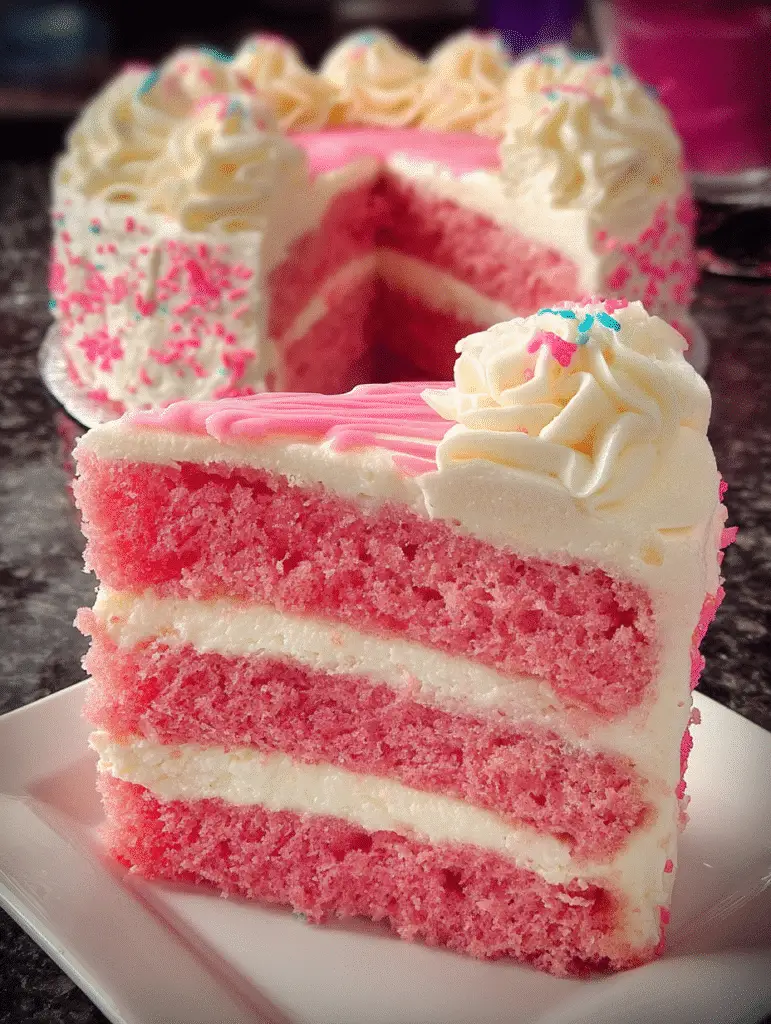
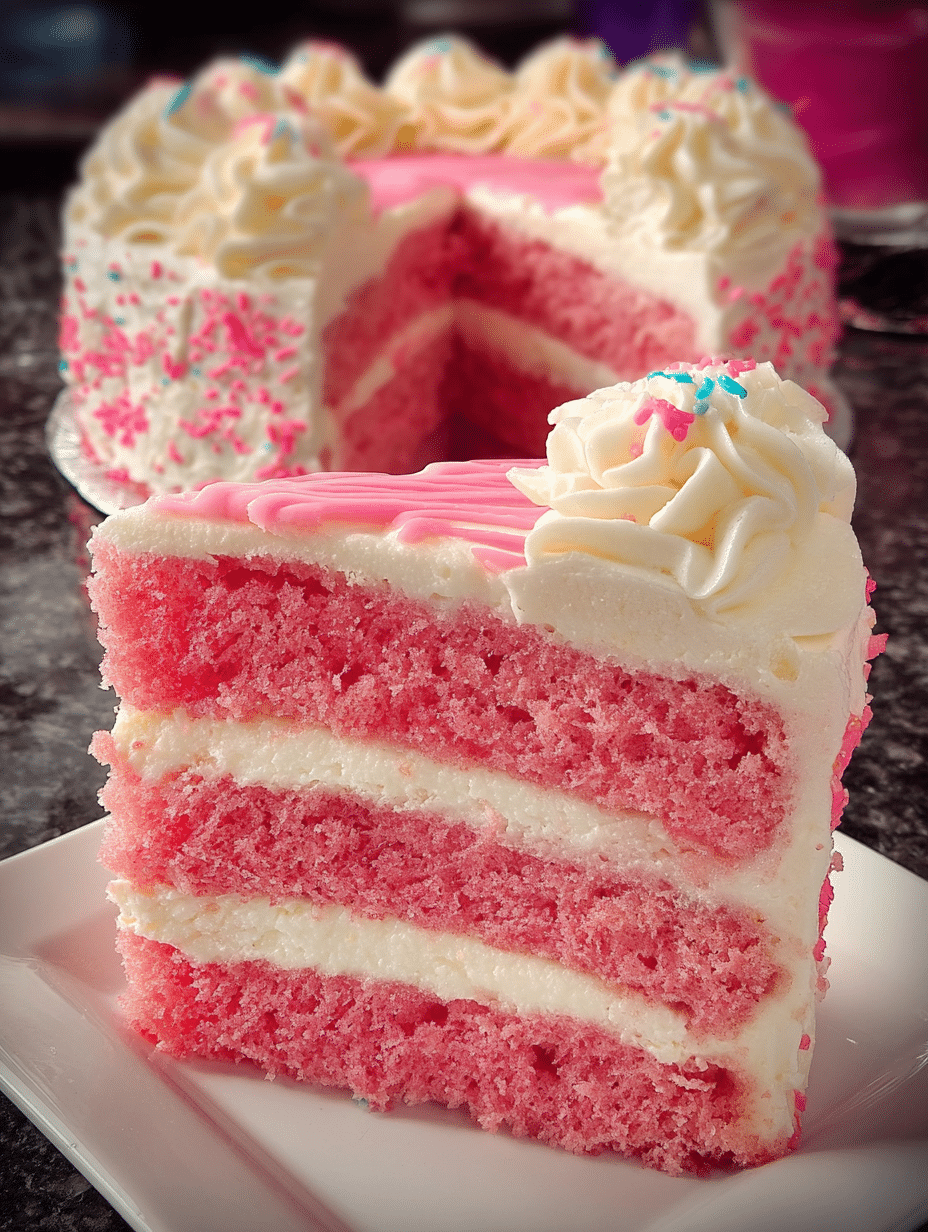
Introduction to Strawberry & Cream Layer Cake
There’s something magical about a Strawberry & Cream Layer Cake that brings a smile to everyone’s face. Whether it’s a sunny afternoon or a special celebration, this cake is a delightful treat that never fails to impress. I remember the first time I made it; the kitchen filled with the sweet aroma of strawberries, and my family couldn’t wait to dig in! This recipe is perfect for those busy days when you want to whip up something special without spending hours in the kitchen. Trust me, this cake will become a cherished favorite in your home!
Why You’ll Love This Strawberry & Cream Layer Cake
This Strawberry & Cream Layer Cake is not just a feast for the eyes; it’s a breeze to make! With simple ingredients and straightforward steps, even novice bakers can shine. The fluffy layers of strawberry-flavored cake paired with rich mascarpone cream create a taste sensation that’s hard to resist. Plus, it’s perfect for any occasion, whether it’s a birthday party or a cozy family dinner. You’ll be the star of the show!
Ingredients for Strawberry & Cream Layer Cake
Gathering the right ingredients is the first step to creating your Strawberry & Cream Layer Cake masterpiece. Here’s what you’ll need:
- Flour: All-purpose flour gives the cake its structure and fluffiness.
- Sugar: Granulated sugar sweetens the cake and helps it rise.
- Baking Powder: This leavening agent ensures your cake rises beautifully.
- Baking Soda: Works alongside baking powder for that perfect lift.
- Salt: A pinch enhances the flavors and balances the sweetness.
- Eggs: They provide moisture and richness, binding everything together.
- Vegetable Oil: Keeps the cake moist and tender.
- Whole Milk: Adds creaminess and helps create a soft texture.
- Strawberry Puree: Freshly blended strawberries infuse the cake with vibrant flavor.
- Vanilla Extract: A splash of vanilla adds warmth and depth to the cake.
- Food Coloring (optional): A few drops of pink can enhance the cake’s appearance.
- Mascarpone Cheese: This rich cheese creates a luxurious cream filling.
- Heavy Cream: Whipped to perfection, it lightens the mascarpone for a dreamy texture.
- Powdered Sugar: Sweetens the cream and helps stabilize it.
- Fresh Strawberries: Chopped strawberries add bursts of flavor between the layers.
- Whole Strawberries and Sprinkles: These are for decorating, making your cake look irresistible.
For exact measurements, check the bottom of the article where you can find everything listed for easy printing. Happy baking!

How to Make Strawberry & Cream Layer Cake
Now that you have all your ingredients ready, let’s dive into the fun part: making your Strawberry & Cream Layer Cake! Follow these simple steps, and you’ll have a stunning cake that tastes as good as it looks.
Step 1: Preheat the Oven
First things first, preheat your oven to 180°C (350°F). Preheating is crucial because it ensures your cake bakes evenly. A hot oven helps the cake rise beautifully, giving it that fluffy texture we all love.
Step 2: Prepare the Cake Pans
Next, grab your three 18 cm round cake pans. Grease them with butter or oil, then dust with flour. This step is essential for easy cake removal later. You want your layers to slide out smoothly, like a dream!
Step 3: Mix Dry Ingredients
In a large bowl, combine the flour, baking powder, baking soda, and salt. Whisk them together until well mixed. This step ensures that the leavening agents are evenly distributed, which is key for a perfectly risen cake.
Step 4: Combine Wet Ingredients
In another bowl, beat the eggs and sugar together until the mixture turns pale and fluffy. Then, add the vegetable oil, whole milk, vanilla extract, and strawberry puree. Mix until everything is well combined. The strawberry puree is what gives this cake its delightful flavor!
Step 5: Combine Wet and Dry Mixtures
Now, it’s time to bring the two mixtures together. Gradually add the dry ingredients to the wet mixture, stirring gently. If you want to add a pop of color, this is the moment to include a few drops of pink food coloring. Mix until just combined; don’t overdo it!
Step 6: Bake the Cakes
Divide the batter evenly among the prepared pans. Bake in your preheated oven for 20-25 minutes. To check for doneness, insert a toothpick into the center of the cakes. If it comes out clean, they’re ready to cool!
Step 7: Prepare the Cream Filling
While the cakes cool, let’s whip up the cream filling. In a cold bowl, combine the mascarpone cheese, heavy cream, powdered sugar, and vanilla extract. Beat until you achieve stiff peaks. This creamy filling is what makes the Strawberry & Cream Layer Cake so indulgent!
Step 8: Assemble the Cake
Once the cakes are completely cool, it’s time to assemble! Place one layer on a serving plate, spread a generous layer of cream filling, and sprinkle chopped strawberries on top. Repeat this process with the remaining layers, creating a beautiful tower of flavor.
Step 9: Decorate the Cake
Finally, cover the entire cake with the remaining cream filling. Use a spatula to smooth the top and sides. For a finishing touch, decorate with rosettes of cream, whole strawberries, and colorful sprinkles. Your Strawberry & Cream Layer Cake is now ready to shine!
Tips for Success
- Use room temperature ingredients for better mixing and texture.
- Don’t overmix the batter; it can make the cake dense.
- Let the cakes cool completely before frosting to prevent melting.
- For extra flavor, consider adding a splash of lemon juice to the cream filling.
- Store leftovers in the fridge to keep the cake fresh and delicious.
Equipment Needed
- Mixing Bowls: Use large bowls for mixing; glass or stainless steel works great.
- Whisk: A hand whisk or electric mixer will do the trick for beating.
- Measuring Cups and Spoons: Essential for accurate ingredient measurements.
- Cake Pans: Three 18 cm round pans; you can use two and slice the top layer if needed.
- Spatula: A rubber spatula is perfect for spreading cream and scraping bowls.
Variations
- Gluten-Free: Substitute all-purpose flour with a gluten-free blend for a delicious gluten-free version.
- Vegan: Use flax eggs, almond milk, and coconut cream instead of eggs, milk, and mascarpone for a plant-based delight.
- Chocolate Strawberry Layer Cake: Add cocoa powder to the dry ingredients for a rich chocolate twist.
- Berry Medley: Mix in other berries like blueberries or raspberries for a colorful and flavorful cake.
- Minty Fresh: Add a hint of mint extract to the cream filling for a refreshing flavor boost.
Serving Suggestions
- Pair your Strawberry & Cream Layer Cake with a scoop of vanilla ice cream for a delightful contrast.
- Serve alongside fresh mint leaves to enhance the cake’s fruity flavors.
- A glass of sparkling lemonade or iced tea complements the sweetness perfectly.
- For presentation, dust the top with powdered sugar before serving for an elegant touch.
FAQs about Strawberry & Cream Layer Cake
Can I use frozen strawberries for the cake?
Absolutely! Frozen strawberries work well, especially for the puree. Just make sure to thaw and drain them before blending to avoid excess moisture in your cake.
How do I store leftover Strawberry & Cream Layer Cake?
Store any leftovers in an airtight container in the fridge. This will keep the cake fresh and the cream filling from melting. Enjoy it within a few days for the best taste!
Can I make this cake ahead of time?
Yes! You can bake the cake layers a day in advance. Just wrap them tightly in plastic wrap and store them at room temperature. Assemble the cake on the day you plan to serve it for the best texture.
What can I substitute for mascarpone cheese?
If you can’t find mascarpone, cream cheese mixed with a bit of heavy cream can be a great alternative. It won’t be quite the same, but it will still be delicious!
Is this Strawberry & Cream Layer Cake suitable for special diets?
This cake can be adapted for various diets! For a gluten-free version, use a gluten-free flour blend. For a vegan option, substitute eggs and dairy with plant-based alternatives. Enjoy the flexibility!
Final Thoughts
Making a Strawberry & Cream Layer Cake is more than just baking; it’s about creating sweet memories. Each layer tells a story, from the fluffy cake to the luscious cream and fresh strawberries. I love how this cake brings people together, whether it’s for a birthday celebration or a simple family gathering. The joy on my loved ones’ faces as they take that first bite is priceless. So, roll up your sleeves, embrace the mess, and enjoy the process. Trust me, this cake will not only satisfy your sweet tooth but also warm your heart!
Print
Strawberry & Cream Layer Cake: A Delicious Recipe Guide
- Total Time: 55 minutes
- Yield: 8-10 servings
- Diet: Vegetarian
Description
A delightful Strawberry & Cream Layer Cake that combines fluffy layers of strawberry-flavored cake with rich mascarpone cream and fresh strawberries.
Ingredients
▢ 250 g all-purpose flour
▢ 200 g granulated sugar
▢ 1 ½ tsp baking powder
▢ ½ tsp baking soda
▢ ½ tsp salt
▢ 3 large eggs
▢ 120 ml vegetable oil
▢ 120 ml whole milk
▢ 150 g strawberry puree
▢ 1 tsp vanilla extract
▢ (Optional) few drops pink food coloring
▢ 250 g cold mascarpone
▢ 250 ml cold heavy cream (30%)
▢ 80 g powdered sugar
▢ 1 tsp vanilla extract
▢ 1 cup fresh strawberries, diced (for filling)
▢ Whole strawberries, for decoration
▢ Colored sprinkles, for decoration
Instructions
1. Preheat oven to 180°C (350°F). Grease and flour three 18 cm round cake pans.
2. In a large bowl, whisk together flour, sugar, baking powder, baking soda, and salt.
3. In another bowl, beat eggs and sugar until pale and fluffy. Add oil, milk, vanilla, and strawberry puree. Mix well.
4. Combine wet and dry ingredients, stirring gently until smooth. Add a few drops of pink food coloring if desired.
5. Divide batter evenly between the three pans. Bake for 20–25 minutes, or until a toothpick comes out clean. Let cakes cool completely.
6. Meanwhile, whip mascarpone, heavy cream, powdered sugar, and vanilla until stiff peaks form. Keep cold.
7. Place one cake layer on a plate. Spread cream over the top and sprinkle with diced strawberries. Repeat with remaining layers.
8. Cover the entire cake with the remaining cream. Decorate with whole strawberries and sprinkles.
Notes
Use room-temperature eggs and milk for a fluffier sponge.
Do not overmix the batter; keep it light.
Chill bowl and whisk before whipping cream for best results.
Cake tastes best the same day but can be refrigerated for up to 2 days.
- Prep Time: 30 minutes
- Cook Time: 25 minutes
- Category: Dessert
- Method: Baking
Nutrition
- Serving Size: 1 slice
- Calories: 350
- Sugar: 25g
- Sodium: 150mg
- Fat: 20g
- Saturated Fat: 10g
- Unsaturated Fat: 5g
- Trans Fat: 0g
- Carbohydrates: 40g
- Fiber: 1g
- Protein: 4g
- Cholesterol: 80mg


