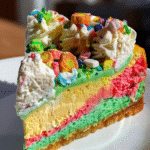
Introduction to Rainbow Cereal Cheesecake
Hey there, fellow dessert lovers! If you’re looking for a show-stopping treat that’s as easy as pie—well, no-bake cheesecake, to be exact—you’ve landed in the right place. This Rainbow Cereal Cheesecake is not just a feast for the eyes; it’s a delightful explosion of flavors and textures that will make your taste buds dance. Perfect for busy days or special occasions, this colorful creation is sure to impress your loved ones. Plus, who can resist a dessert that brings a little magic to the table? Let’s dive into this fun and fabulous recipe!
Why You’ll Love This Rainbow Cereal Cheesecake
This Rainbow Cereal Cheesecake is a dream come true for anyone who loves desserts but craves simplicity. It’s a no-bake wonder that comes together in just 30 minutes, making it perfect for those hectic days. The creamy vanilla filling paired with a crunchy cereal crust creates a delightful contrast that’s hard to resist. Plus, the vibrant colors make it a hit at any gathering, bringing smiles and joy to everyone around!
Ingredients for Rainbow Cereal Cheesecake
Gathering the right ingredients is the first step to creating your Rainbow Cereal Cheesecake masterpiece. Here’s what you’ll need:
- Crushed cereal: Use something colorful like Fruity Pebbles or Cornflakes for that crunchy base.
- Melted butter: This binds the cereal together, creating a delicious crust that holds everything in place.
- Sugar: Just a touch to sweeten the crust and enhance the flavors.
- Cream cheese: The star of the show! Softened cream cheese gives the cheesecake its rich and creamy texture.
- Powdered sugar: This adds sweetness and helps achieve that smooth filling we all love.
- Heavy whipping cream: Whipped to stiff peaks, it lightens the filling and adds a fluffy texture.
- Vanilla extract: A splash of vanilla brings warmth and depth to the cheesecake.
- Gel food coloring: Choose vibrant colors like red, yellow, green, and blue to create those stunning layers.
- Whipped cream: For topping, it adds a light and airy finish to your cheesecake.
- Lucky Charms marshmallows or colorful cereal pieces: These fun toppings add a whimsical touch and extra sweetness.
- Sprinkles (optional): Because who doesn’t love a little extra sparkle on their dessert?
For exact measurements, check the bottom of the article where you can find everything listed for easy printing. Now, let’s get ready to create some magic in the kitchen!
How to Make Rainbow Cereal Cheesecake
Now that we have our ingredients ready, let’s jump into the fun part—making this Rainbow Cereal Cheesecake! Follow these simple steps, and you’ll be on your way to creating a colorful masterpiece that will wow everyone.
Step 1: Prepare the Crust
First things first, let’s get that crust ready. In a mixing bowl, combine the crushed cereal, melted butter, and sugar. Stir until everything is well mixed and resembles wet sand.
Then, press this mixture firmly into the bottom of a springform pan. Make sure it’s even and compact.
Now, pop it in the fridge for about 15 minutes to set. This step is crucial for a sturdy base that holds all that creamy goodness!
Step 2: Make the Cream Cheese Filling
While the crust is chilling, it’s time to whip up the filling. In a large bowl, beat the softened cream cheese, powdered sugar, and vanilla extract until it’s smooth and creamy.
Next, gently fold in the whipped cream until everything is combined.
Now, divide this luscious mixture into 3–4 bowls. Here comes the fun part—tint each bowl with a different color of gel food coloring.
Mix until you achieve vibrant shades that will make your cheesecake pop!
Step 3: Layer the Colors
With your colorful fillings ready, it’s time to layer them over the crust. Start with one color and spread it evenly over the chilled crust.
Use a spatula to smooth it out gently.
After that, chill this layer for about 15–20 minutes. This helps keep the colors distinct.
Repeat this process with the remaining colors, chilling each layer before adding the next.
Trust me, the anticipation will be worth it when you see those beautiful stripes!
Step 4: Add Toppings
Once all the layers are set, it’s time to get creative with toppings!
Add swirls of whipped cream on top for a fluffy finish.
Then, sprinkle on those Lucky Charms marshmallows or colorful cereal pieces for a whimsical touch.
If you’re feeling extra festive, toss on some sprinkles for that final pop of color!
Step 5: Chill and Serve
Now, the hardest part—waiting! Refrigerate your Rainbow Cereal Cheesecake for at least 4 hours, or even better, overnight.
This allows it to firm up beautifully.
When you’re ready to serve, slice it up and enjoy the rainbow! Each bite is a delightful mix of creamy, crunchy, and colorful goodness that’s sure to bring smiles all around.
Tips for Success
- Use gel food coloring for vibrant, eye-catching layers.
- Ensure your cream cheese is softened for easy mixing and a smooth filling.
- Chill each layer for 15–20 minutes to maintain distinct colors.
- Don’t rush the chilling process; it’s key for a firm cheesecake.
- Feel free to get creative with toppings—let your imagination run wild!
Equipment Needed
- Springform pan: Essential for easy removal; a regular pie dish works too.
- Mixing bowls: Use various sizes for mixing ingredients; any bowl will do.
- Electric mixer: For beating cream cheese; a whisk can work if you’re up for a workout!
- Spatula: Perfect for spreading layers; a butter knife can be a handy substitute.
- Measuring cups and spoons: For accuracy; you can eyeball it if you’re feeling adventurous!
Variations of Rainbow Cereal Cheesecake
- Gluten-Free Option: Swap out regular cereal for gluten-free varieties like Rice Chex or gluten-free Fruity Pebbles.
- Vegan Twist: Use vegan cream cheese and coconut whipped cream for a plant-based version that’s just as delicious.
- Flavor Infusions: Experiment with flavored extracts like almond or lemon to add a unique twist to the filling.
- Fruit Layers: Incorporate pureed fruits like strawberries or blueberries between the layers for a fruity surprise.
- Chocolate Lovers: Add cocoa powder to one of the cream cheese mixtures for a chocolatey layer that pairs beautifully with the vanilla.
Serving Suggestions for Rainbow Cereal Cheesecake
- Pair with fresh fruit like strawberries or blueberries for a refreshing contrast.
- Serve alongside a scoop of vanilla ice cream for an extra indulgent treat.
- Drizzle with chocolate or caramel sauce for a decadent touch.
- Present on a colorful platter to enhance the vibrant layers.
- Enjoy with a glass of cold milk or a fruity punch for a fun twist!
FAQs about Rainbow Cereal Cheesecake
Can I make Rainbow Cereal Cheesecake ahead of time?
Absolutely! This no-bake cheesecake is perfect for making ahead. Just prepare it the day before your event and let it chill overnight. It’ll be ready to impress your guests!
What can I use instead of cream cheese?
If you’re looking for a substitute, try using mascarpone cheese or a vegan cream cheese alternative. Both will give you a creamy texture, perfect for your Rainbow Cereal Cheesecake.
How long does the cheesecake last in the fridge?
Your Rainbow Cereal Cheesecake can last up to 5 days in the fridge. Just make sure to cover it well to keep it fresh and delicious!
Can I use different cereals for the crust?
Is this Rainbow Cereal Cheesecake suitable for kids?
Final Thoughts
Creating this Rainbow Cereal Cheesecake is more than just baking; it’s about bringing joy and color into your kitchen. Each layer tells a story, and every slice is a celebration of flavors that can brighten anyone’s day. Whether you’re sharing it with family or enjoying it solo, this dessert is a reminder that life is meant to be sweet and fun. So, roll up your sleeves, unleash your creativity, and let this no-bake delight bring a splash of happiness to your table. Trust me, the smiles you’ll receive will be worth every colorful bite!
Print
Rainbow Cereal Cheesecake: A Colorful No-Bake Delight!
- Total Time: 30 minutes (plus chilling)
- Yield: 8–10 slices 1x
- Diet: Vegetarian
Description
A no-bake rainbow cheesecake bursting with layers of pastel color, creamy vanilla filling, crunchy cereal crust, and whipped cream topped with Lucky Charms marshmallows — pure magic in every bite!
Ingredients
- 2 cups crushed cereal (like Fruity Pebbles or Cornflakes)
- ½ cup melted butter
- 2 tbsp sugar
- 16 oz cream cheese (softened)
- 1 cup powdered sugar
- 1 cup heavy whipping cream (whipped to stiff peaks)
- 1 tsp vanilla extract
- Gel food coloring (red, yellow, green, blue)
- Whipped cream (for topping)
- Lucky Charms marshmallows or colorful cereal pieces (for topping)
- Sprinkles (optional)
Instructions
- Mix crushed cereal, melted butter, and sugar. Press into the bottom of a springform pan. Chill for 15 minutes.
- Beat cream cheese, powdered sugar, and vanilla until smooth. Fold in whipped cream. Divide mixture into 3–4 bowls and tint each with a different color.
- Spread each colored layer over the crust, smoothing gently. Chill each layer for 15–20 minutes before adding the next for cleaner stripes.
- Add whipped cream swirls, marshmallows, and sprinkles on top.
- Refrigerate for at least 4 hours or overnight until firm. Slice and enjoy the rainbow!
Notes
- For best results, use gel food coloring for vibrant colors.
- Make sure the cream cheese is softened for easy mixing.
- Chilling each layer helps maintain distinct colors.
- Prep Time: 30 minutes
- Cook Time: 0 minutes
- Category: Dessert
- Method: No-bake
- Cuisine: American
Nutrition
- Serving Size: 1 slice
- Calories: 350
- Sugar: 25g
- Sodium: 150mg
- Fat: 22g
- Saturated Fat: 12g
- Unsaturated Fat: 8g
- Trans Fat: 0g
- Carbohydrates: 30g
- Fiber: 1g
- Protein: 4g
- Cholesterol: 60mg


