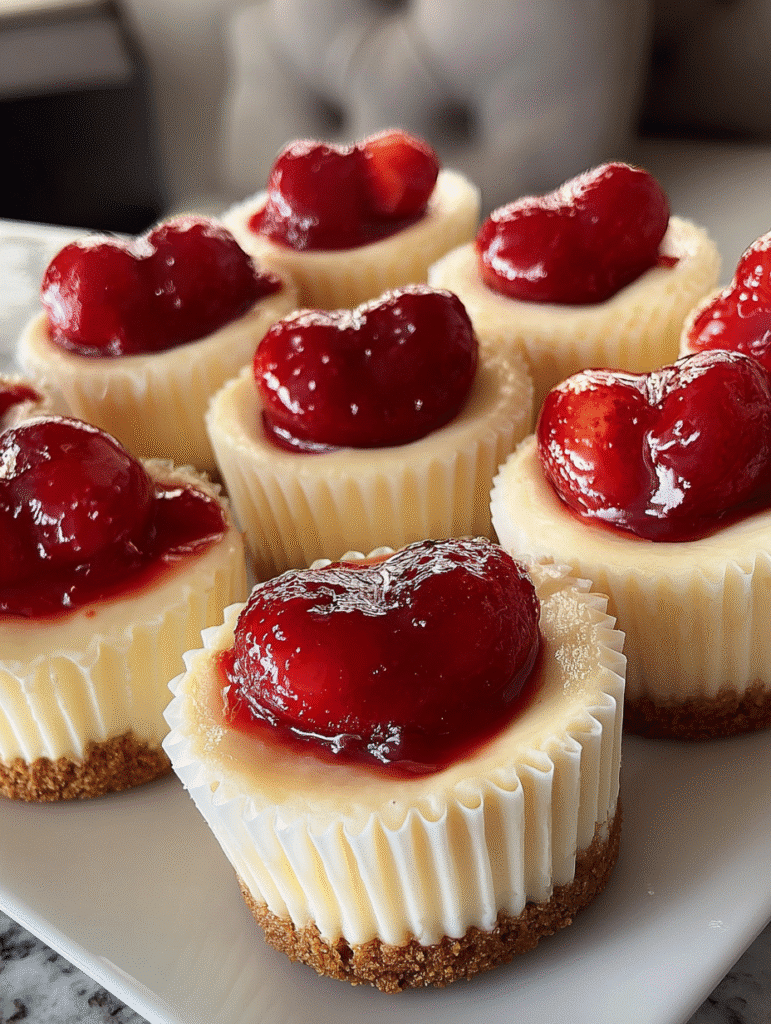
Introduction to Mini Cherry Cheesecake Cups
Hey there, fellow dessert lovers! If you’re anything like me, you know that sometimes life gets busy, and you need a quick solution to satisfy that sweet tooth. Enter the delightful Mini Cherry Cheesecake Cups! These little gems are not only creamy and delicious, but they also come with a buttery graham cracker crust that’s simply irresistible. Perfect for parties, potlucks, or just a cozy night in, these bite-sized treats are sure to impress your loved ones. Trust me, once you try them, you’ll be dreaming of these mini cheesecakes long after the last bite!
Why You’ll Love This Mini Cherry Cheesecake Cups
These Mini Cherry Cheesecake Cups are a game-changer in the dessert world! They’re incredibly easy to whip up, making them perfect for busy weeknights or last-minute gatherings. The creamy filling paired with the sweet cherry topping creates a flavor explosion that will have everyone coming back for seconds. Plus, their bite-sized nature means you can indulge without the guilt. Trust me, these little delights will become your new go-to dessert!
Ingredients for Mini Cherry Cheesecake Cups
Let’s gather our ingredients for these delightful Mini Cherry Cheesecake Cups! Each component plays a vital role in creating that perfect balance of flavors and textures. Here’s what you’ll need:
- Graham cracker crumbs: These form the buttery crust that cradles the creamy filling. You can crush your own or buy pre-made crumbs for convenience.
- Granulated sugar: A touch of sweetness for both the crust and the filling, enhancing the overall flavor.
- Unsalted butter: This adds richness to the crust. Make sure it’s melted for easy mixing.
- Cream cheese: The star of the show! Softened cream cheese gives the cheesecake its creamy texture. Don’t skimp on quality here!
- Sour cream: This adds a tangy flavor and creaminess to the filling, making it extra luscious.
- Eggs: They help bind everything together, giving the cheesecake its structure.
- Vanilla extract: A splash of vanilla elevates the flavor profile, making it even more delicious.
- Cherry pie filling: The crowning glory! You can use canned for convenience or make your own with fresh cherries simmered with sugar and cornstarch for a homemade touch.
For exact measurements, check the bottom of the article where you can find everything listed for easy printing. Now, let’s get ready to create some magic in the kitchen!

How to Make Mini Cherry Cheesecake Cups
Now that we have our ingredients ready, let’s dive into the fun part—making these Mini Cherry Cheesecake Cups! Follow these simple steps, and you’ll be on your way to dessert heaven in no time.
Step 1: Preheat the Oven
First things first, preheat your oven to 325°F (160°C). This ensures that your mini cheesecakes bake evenly. While the oven warms up, grab a 12-cup muffin tin and line it with paper liners. This will make it super easy to remove the cheesecakes later!
Step 2: Prepare the Crust
In a mixing bowl, combine the graham cracker crumbs, sugar, and melted butter. Stir until the mixture resembles wet sand. It should hold together when you squeeze it in your hand. Now, take about a tablespoon of this mixture and press it firmly into the bottom of each muffin cup. This buttery crust is the perfect base for your Mini Cherry Cheesecake Cups!
Step 3: Make the Cheesecake Filling
Next, it’s time to make the creamy filling. In a large bowl, beat the softened cream cheese until it’s smooth and fluffy. Then, add in the sugar and mix well. One by one, beat in the eggs, ensuring each one is fully incorporated before adding the next. Finally, stir in the sour cream and vanilla extract. This filling is what dreams are made of!
Step 4: Assemble and Bake
Now, divide the cheesecake batter evenly over the crusts in your muffin tin. Don’t worry if it looks a bit messy; it’ll all come together in the oven. Bake for 18–20 minutes, or until the centers are set but still slightly jiggly. This is the sweet spot for that creamy texture!
Step 5: Cool and Chill
Once baked, remove the muffin tin from the oven and let it cool to room temperature. This step is crucial, as it helps the cheesecakes firm up. After they’ve cooled, pop them in the refrigerator for at least 2 hours. Chilling allows the flavors to meld beautifully.
Step 6: Top with Cherry Filling
Finally, it’s time for the cherry topping! Just before serving, spoon a generous amount of cherry pie filling over each mini cheesecake. The glossy cherries add a pop of color and sweetness that perfectly complements the creamy filling. Now, you’re ready to impress your friends and family!
Tips for Success
- Make sure your cream cheese is at room temperature for a smooth filling.
- Don’t overmix the batter; this keeps your cheesecakes light and fluffy.
- Use a cookie scoop for even batter distribution over the crusts.
- Let the cheesecakes cool completely before refrigerating for best results.
- Top with fresh cherries for an extra burst of flavor!
Equipment Needed
- Muffin tin: A standard 12-cup muffin tin works best, but you can use silicone molds for easy removal.
- Mixing bowls: A large bowl for the filling and a smaller one for the crust.
- Electric mixer: A hand mixer or stand mixer makes beating the cream cheese a breeze.
- Measuring cups and spoons: Essential for accurate ingredient measurements.
- Spatula: Perfect for scraping down the sides of the bowl and transferring the batter.
Variations
- Chocolate Mini Cherry Cheesecake Cups: Add melted chocolate to the cheesecake filling for a rich, decadent twist.
- Gluten-Free Option: Substitute graham cracker crumbs with gluten-free cookies or almond flour for a gluten-free crust.
- Fruit Toppings: Experiment with different fruit toppings like blueberries, strawberries, or even a mix of fresh berries for a colorful presentation.
- Vegan Version: Use vegan cream cheese and a flaxseed mixture instead of eggs for a plant-based alternative.
- Mini Lemon Cheesecake Cups: Add lemon zest and juice to the filling for a refreshing citrus flavor.
Serving Suggestions
- Pair with a dollop of whipped cream for an extra creamy touch.
- Serve alongside a scoop of vanilla ice cream for a delightful contrast.
- Garnish with fresh mint leaves for a pop of color and freshness.
- Enjoy with a cup of coffee or tea to balance the sweetness.
- Present on a decorative platter for an elegant touch at gatherings.
FAQs about Mini Cherry Cheesecake Cups
As I’ve shared my love for these Mini Cherry Cheesecake Cups, I know you might have a few questions. Let’s dive into some common queries to help you on your cheesecake journey!
Can I make Mini Cherry Cheesecake Cups ahead of time?
Absolutely! These mini cheesecakes are perfect for making ahead. Just prepare them, chill, and they’ll be ready to serve when you are. They can be stored in the refrigerator for up to three days.
What can I use instead of cherry pie filling?
If you’re feeling adventurous, you can use fresh cherries simmered with sugar and cornstarch for a homemade topping. Alternatively, other fruit fillings like blueberry or strawberry work wonderfully too!
How do I know when the cheesecakes are done baking?
Look for the centers to be set but still slightly jiggly. They will firm up as they cool. Overbaking can lead to a dry texture, so keep an eye on them!
Can I freeze Mini Cherry Cheesecake Cups?
Yes, you can freeze them! Just make sure they are well-wrapped in plastic wrap and stored in an airtight container. Thaw them in the refrigerator before serving for the best texture.
What’s the best way to serve Mini Cherry Cheesecake Cups?
Serve them chilled, topped with a generous spoonful of cherry filling. A dollop of whipped cream or a sprinkle of chocolate shavings can elevate them even more!
Final Thoughts
Creating these Mini Cherry Cheesecake Cups is more than just baking; it’s about sharing joy and sweetness with those you love. Each bite is a delightful blend of creamy cheesecake and tart cherries, wrapped in a buttery crust that feels like a warm hug. Whether you’re celebrating a special occasion or simply treating yourself, these little desserts bring smiles all around. I hope you enjoy making them as much as I do! So, roll up your sleeves, gather your ingredients, and let the magic of these mini cheesecakes brighten your day!
Print
Mini Cherry Cheesecake Cups are a must-try dessert!
- Total Time: 2 hours 35 minutes
- Yield: 12 mini cheesecakes 1x
- Diet: Vegetarian
Description
Creamy, bite-sized cheesecakes with buttery graham cracker crusts, topped with glossy cherries. Perfect for parties or a make-ahead dessert!
Ingredients
- 1 cup graham cracker crumbs
- 2 tbsp granulated sugar
- 4 tbsp unsalted butter, melted
- 16 oz (450 g) cream cheese, softened
- ½ cup granulated sugar
- 2 large eggs
- ½ cup sour cream
- 1 tsp vanilla extract
- 1 can (21 oz) cherry pie filling (or fresh cherries simmered with sugar & cornstarch)
Instructions
- Preheat oven to 325°F (160°C). Line a 12-cup muffin tin with paper liners.
- Mix graham cracker crumbs, sugar, and melted butter until sandy.
- Press about 1 tbsp of mixture firmly into each muffin cup.
- Beat cream cheese until smooth.
- Add sugar and mix well.
- Beat in eggs, one at a time. Stir in sour cream and vanilla.
- Divide batter evenly over crusts.
- Bake 18–20 minutes, until centers are set but slightly jiggly.
- Cool to room temperature, then refrigerate at least 2 hours.
- Spoon cherry pie filling over each mini cheesecake.
- Keep chilled until serving.
Notes
- These mini cheesecakes can be made ahead of time and stored in the refrigerator.
- Feel free to use fresh cherries instead of canned for a fresher taste.
- Prep Time: 15 minutes
- Cook Time: 18–20 minutes
- Category: Dessert
- Method: Baking
- Cuisine: American
Nutrition
- Serving Size: 1 mini cheesecake
- Calories: 200
- Sugar: 15g
- Sodium: 150mg
- Fat: 10g
- Saturated Fat: 6g
- Unsaturated Fat: 3g
- Trans Fat: 0g
- Carbohydrates: 25g
- Fiber: 1g
- Protein: 3g
- Cholesterol: 50mg


