Introduction to Frankenstein Cheesecake
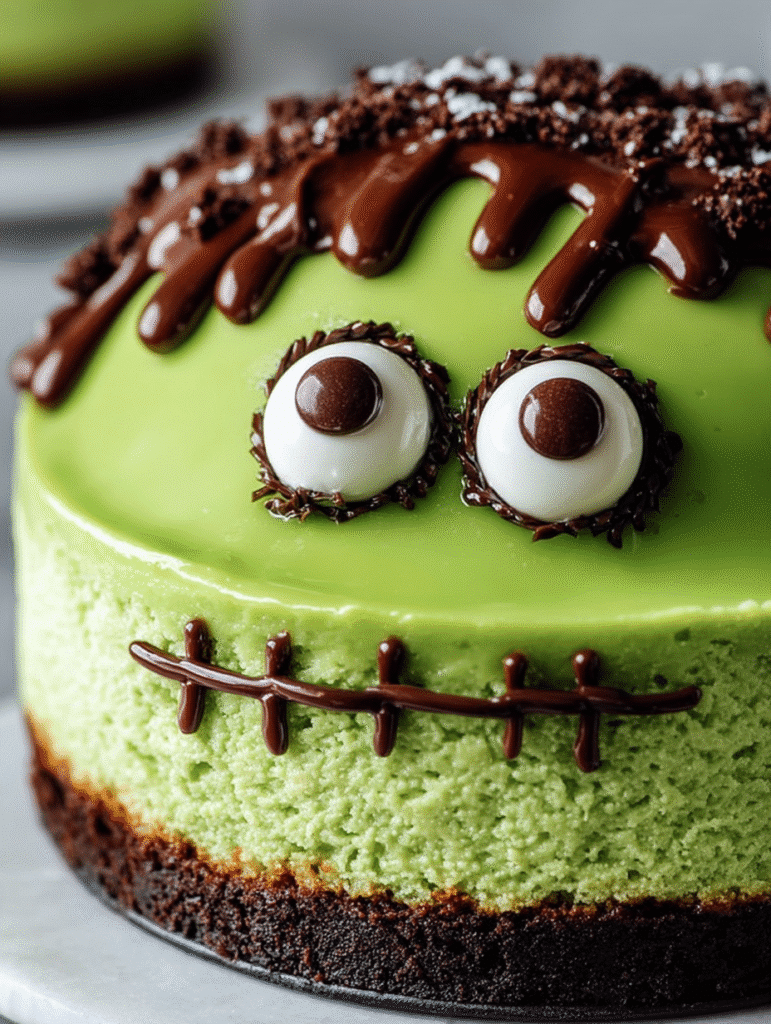
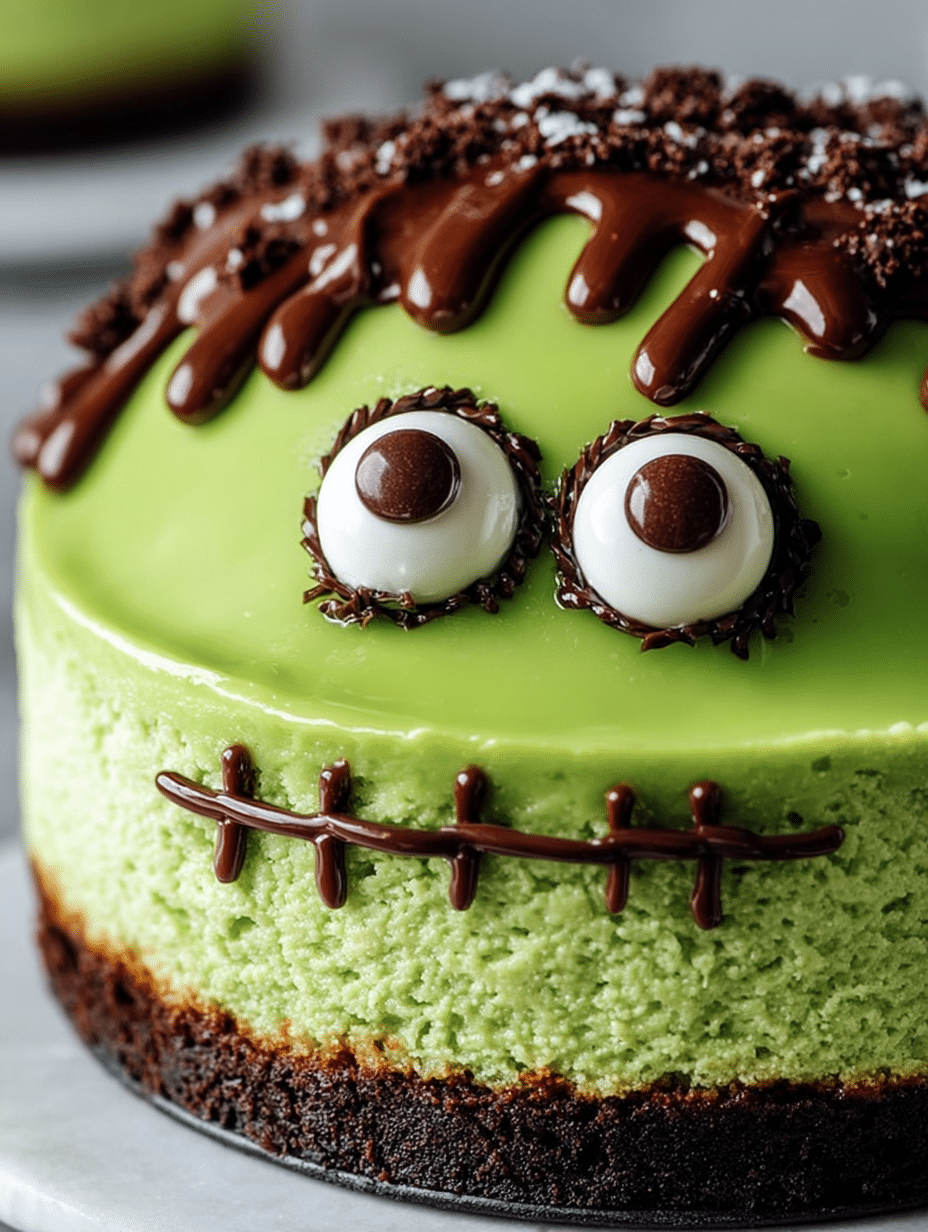
Welcome, fellow home cooks! If you’re looking to whip up something delightfully spooky, then this Frankenstein Cheesecake is just the treat you need. It’s creamy, vibrant green, and oh-so-fun to make! Perfect for Halloween gatherings or just to impress your loved ones, this cheesecake combines a rich chocolate crust with a glossy green glaze. Trust me, it’s a quick solution for a busy day or a festive dessert that will have everyone talking. So, roll up your sleeves, and let’s dive into this deliciously frightful adventure together!
Why You’ll Love This Frankenstein Cheesecake
This Frankenstein Cheesecake is not just a treat for the eyes; it’s a breeze to make! With simple ingredients and straightforward steps, even novice bakers can shine. Plus, the combination of creamy cheesecake and a crunchy chocolate crust is simply irresistible. It’s a crowd-pleaser that brings smiles and spooky vibes to any gathering. Trust me, once you serve this, you’ll be the star of the show!
Ingredients for Frankenstein Cheesecake
Gathering the right ingredients is half the fun of making this Frankenstein Cheesecake! Here’s what you’ll need:
- Chocolate cookie crumbs: These form the base of your cheesecake. Oreos work perfectly, but any chocolate cookie will do.
- Granulated sugar: A touch of sweetness to balance the rich flavors of the cream cheese.
- Unsalted butter: This helps bind the crust together and adds a rich flavor.
- Cream cheese: The star of the show! It gives the cheesecake its creamy texture and tangy taste.
- Large eggs: They help the cheesecake set and provide a lovely structure.
- Sour cream: Adds creaminess and a slight tang, enhancing the overall flavor.
- Vanilla extract: A splash of vanilla elevates the taste, making it even more delicious.
- Flour: Just a bit to help stabilize the filling and give it a nice texture.
- Green gel food coloring: This is what gives our cheesecake that iconic Frankenstein green hue. Adjust to your liking!
- White chocolate chips: These melt beautifully to create a glossy glaze that adds a sweet finish.
- Heavy cream: Used to melt the white chocolate, making it smooth and pourable.
- Melted chocolate: For decorating the face—think hair, mouth, and stitches!
- Crushed Oreos: These add texture to the hair, making it look extra spooky.
- Candy eyes: The finishing touch! They bring your Frankenstein to life. You can also use white chocolate buttons with chocolate chips for pupils.
For exact measurements, check the bottom of the article where you can find everything listed for easy printing. Happy baking!

How to Make Frankenstein Cheesecake
Now that we have our ingredients ready, let’s dive into the fun part—making this Frankenstein Cheesecake! Follow these simple steps, and you’ll have a spooky dessert that’s sure to impress.
Step 1: Preheat and Prepare the Crust
First things first, preheat your oven to 325°F (160°C). This ensures your cheesecake bakes evenly. While the oven warms up, grab a mixing bowl and combine your chocolate cookie crumbs, sugar, and melted butter. Mix until everything is evenly moistened. It should feel like damp sand. Then, press this mixture firmly into the bottom of a 9-inch springform pan. Make sure it’s packed tightly for a sturdy crust!
Step 2: Bake the Crust
Once your crust is ready, pop it in the oven and bake for about 8 minutes. This quick bake helps set the crust, giving it a nice crunch. After baking, take it out and let it cool while you prepare the filling. The aroma of chocolate will fill your kitchen, and trust me, it’s heavenly!
Step 3: Make the Cheesecake Filling
In a large mixing bowl, beat the softened cream cheese and sugar together until smooth and creamy. I like to use an electric mixer for this part—it makes it easier! Next, add the eggs one at a time, mixing slowly after each addition. This helps keep the filling light and fluffy. Then, blend in the sour cream, vanilla extract, and flour. Finally, stir in the green gel food coloring until you achieve that perfect Frankenstein green. It’s like magic watching it transform!
Step 4: Bake the Cheesecake
Now, pour the creamy filling over your cooled crust. Spread it evenly with a spatula. Bake the cheesecake for 55 to 60 minutes. You want the edges to be set, but the center should still jiggle slightly. This jiggle means it will firm up as it cools. Once done, turn off the oven, crack the door open, and let the cheesecake rest inside for an hour. This gentle cooling helps prevent cracks.
Step 5: Cool and Chill
After the hour is up, take the cheesecake out and let it cool to room temperature. Then, cover it and chill in the fridge for at least 4 hours, or overnight if you can wait! Chilling is crucial for the flavors to meld and for the cheesecake to set perfectly. I often make mine the night before a gathering—it’s one less thing to worry about!
Step 6: Prepare the Green Glaze
While your cheesecake chills, let’s make the glossy green glaze. Heat the heavy cream in a small saucepan until it’s warm but not boiling. Pour it over the white chocolate chips in a bowl and stir until smooth. Add a few drops of green gel food coloring to achieve that vibrant hue. This glaze will add a beautiful finish to your Frankenstein Cheesecake!
Step 7: Decorate the Cheesecake
Once your cheesecake is chilled and the glaze is ready, it’s time to decorate! Pour the green glaze over the top of the cheesecake, spreading it evenly. Then, drizzle melted chocolate along the top edge to create “hair.” Sprinkle crushed Oreos on top for texture. Finally, attach the candy eyes with a dab of melted chocolate and pipe on a stitched mouth. Your Frankenstein Cheesecake is now ready to scare and delight!
Tips for Success
- Chill the cheesecake overnight for the best flavor and texture.
- Use room temperature ingredients for a smoother filling.
- Adjust the green food coloring to achieve your desired shade of Frankenstein green.
- Slice with a serrated knife for clean edges.
- Don’t skip the resting time in the oven; it helps prevent cracks.
Equipment Needed
- 9-inch springform pan: Essential for easy removal. A regular cake pan works too, but slicing will be trickier.
- Mixing bowls: Use a large bowl for the filling and a smaller one for the crust.
- Electric mixer: Makes beating the cream cheese a breeze. A whisk works, but it’ll take longer.
- Spatula: Perfect for spreading the filling and glaze evenly.
- Measuring cups and spoons: For accurate ingredient measurements.
Variations
- Gluten-Free Option: Substitute chocolate cookie crumbs with gluten-free cookies to make this Frankenstein Cheesecake suitable for gluten-sensitive friends.
- Vegan Twist: Use vegan cream cheese and replace eggs with flaxseed meal mixed with water for a plant-based version.
- Flavor Infusion: Add a teaspoon of peppermint extract for a refreshing twist or mix in crushed candy canes for a festive touch.
- Fruit Topping: Top with fresh raspberries or strawberries for a pop of color and a fruity contrast to the rich cheesecake.
- Chocolate Lovers: Fold in mini chocolate chips into the cheesecake filling for an extra chocolatey delight!
Serving Suggestions
- Pair with Whipped Cream: A dollop of whipped cream adds a light touch to the rich cheesecake.
- Serve with Fresh Berries: Raspberries or strawberries provide a refreshing contrast to the sweetness.
- Complement with Hot Chocolate: A warm cup of hot chocolate makes for a cozy pairing.
- Presentation Tip: Serve on a spooky-themed platter for added Halloween flair!
FAQs about Frankenstein Cheesecake
As I’ve shared my love for this Frankenstein Cheesecake, I know you might have some questions. Here are a few common ones that pop up, along with my answers to help you out!
Can I make Frankenstein Cheesecake ahead of time?
Absolutely! In fact, I recommend making it a day in advance. Chilling overnight enhances the flavors and ensures a perfect texture. Just keep it covered in the fridge!
What can I use instead of cream cheese?
If you’re looking for a substitute, try using mascarpone cheese or a vegan cream cheese alternative. Both will give you a creamy texture, though the flavor may vary slightly.
How do I store leftovers?
Store any leftover Frankenstein Cheesecake in an airtight container in the fridge. It should last for about 3 to 5 days, but trust me, it’s so good, it might not last that long!
Can I freeze Frankenstein Cheesecake?
Yes, you can freeze it! Just wrap it tightly in plastic wrap and then in aluminum foil. It can be frozen for up to 2 months. Thaw it in the fridge before serving.
What if I can’t find green gel food coloring?
No worries! You can use regular food coloring, but you may need to use more to achieve that vibrant Frankenstein green. Alternatively, you can blend in some matcha powder for a natural green hue!
Final Thoughts
Creating this Frankenstein Cheesecake is more than just baking; it’s about crafting a delightful experience that brings joy to your kitchen and smiles to your loved ones. The vibrant green color and spooky decorations make it a showstopper at any gathering. Plus, the creamy texture paired with the crunchy chocolate crust is simply irresistible! Whether you’re celebrating Halloween or just want to add a bit of fun to your dessert table, this cheesecake is sure to impress. So, gather your ingredients, unleash your creativity, and enjoy the sweet satisfaction of making something truly special!
Print
Frankenstein Cheesecake: Create Spooky Deliciousness Today!
- Total Time: 4 hours 30 minutes (or overnight)
- Yield: 10–12 servings 1x
- Diet: Vegetarian
Description
A creamy green cheesecake with a chocolate crust, glossy green glaze, and spooky Frankenstein face decorations. Fun, festive, and frightfully delicious!
Ingredients
- 1 ½ cups chocolate cookie crumbs (Oreo or similar)
- ¼ cup granulated sugar
- 6 tbsp unsalted butter, melted
- 3 (8 oz) blocks cream cheese, softened
- 1 cup granulated sugar
- 3 large eggs, room temperature
- 1 cup sour cream
- 2 tsp vanilla extract
- 2 tbsp flour
- Green gel food coloring (as needed for Frankenstein green)
- ½ cup white chocolate chips
- ¼ cup heavy cream
- Melted chocolate (for hair, mouth, and stitches)
- Crushed Oreos (for “hair texture”)
- Large candy eyes (or white chocolate buttons + chocolate chips for pupils)
Instructions
- Preheat oven to 325°F (160°C).
- Mix cookie crumbs, sugar, and melted butter until evenly moistened.
- Press firmly into bottom of a 9-inch springform pan.
- Bake 8 minutes, then set aside.
- Beat cream cheese and sugar until smooth.
- Add eggs one at a time, mixing slowly.
- Blend in sour cream, vanilla, and flour.
- Stir in green gel food coloring until you reach a bright Frankenstein shade.
- Pour over crust.
- Bake 55–60 minutes until edges are set but center jiggles slightly.
- Turn off oven, crack door, and rest cheesecake inside for 1 hour.
- Chill in fridge at least 4 hours or overnight.
- Heat cream until warm (not boiling).
- Pour over white chocolate chips; stir until smooth.
- Tint with green food coloring.
- Pour glaze over chilled cheesecake and spread evenly.
- Drizzle melted chocolate along top edge and let it drip down to form “hair.”
- Sprinkle crushed Oreos over hair for texture.
- Attach candy eyes with a dab of melted chocolate.
- Pipe on a stitched mouth with remaining melted chocolate.
Notes
- For best results, chill the cheesecake overnight.
- Adjust the amount of green food coloring to achieve desired shade.
- Use a serrated knife to slice the cheesecake for clean edges.
- Prep Time: 30 minutes
- Cook Time: 60 minutes
- Category: Dessert
- Method: Baking
- Cuisine: American
Nutrition
- Serving Size: 1 slice
- Calories: 350
- Sugar: 25g
- Sodium: 200mg
- Fat: 22g
- Saturated Fat: 12g
- Unsaturated Fat: 8g
- Trans Fat: 0g
- Carbohydrates: 30g
- Fiber: 1g
- Protein: 5g
- Cholesterol: 80mg


