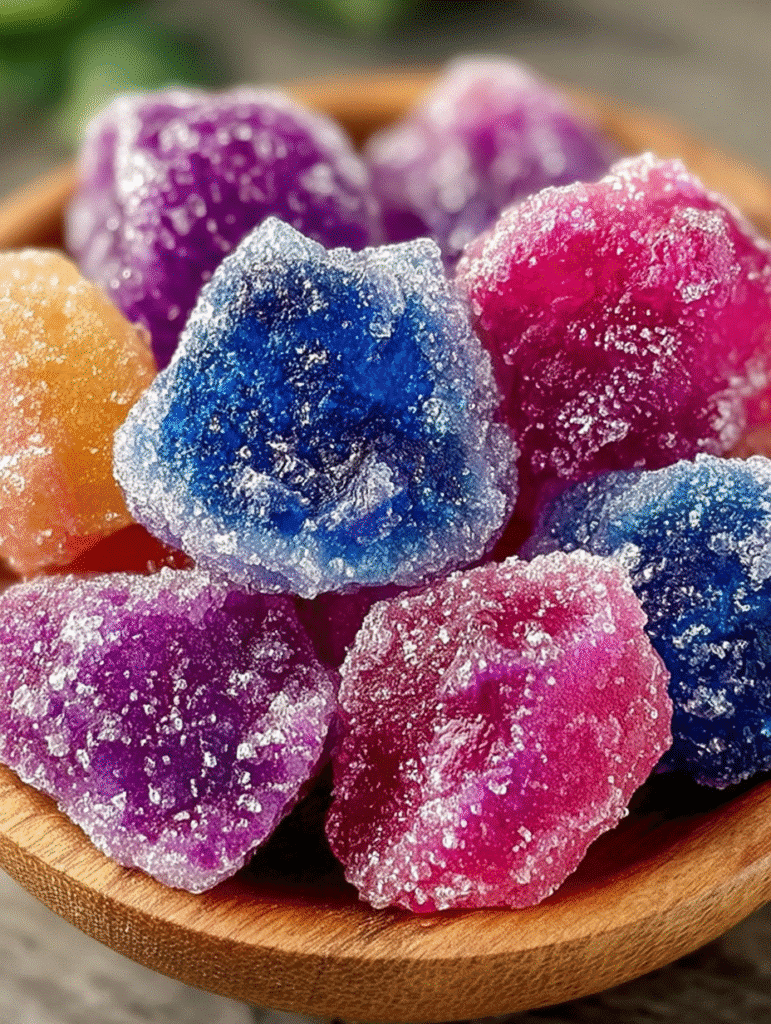
Introduction to DIY Candy Geodes
Have you ever wanted to create something that sparkles and delights? With DIY Candy Geodes, you can bring a touch of magic to your kitchen! This fun and easy recipe is perfect for a weekend project or a special treat for loved ones. Imagine the joy on their faces when they see these colorful, shimmering gems. Plus, making candy geodes is a fantastic way to bond with family or friends. Whether you’re a seasoned pro or a curious beginner, this recipe is a sweet escape into the world of edible crafts!
Why You’ll Love This DIY Candy Geodes
DIY Candy Geodes are not just visually stunning; they’re incredibly easy to make! In about an hour and a half, you can whip up these delightful treats that taste as good as they look. The best part? You can customize flavors and colors to suit your taste buds. Whether you’re impressing guests or treating your kids, these sparkling gems are sure to bring smiles all around!
Ingredients for DIY Candy Geodes
Gathering the right ingredients is the first step to creating your dazzling DIY Candy Geodes. Here’s what you’ll need:
- Granulated sugar: The star of the show! It forms the base of your candy and gives it that sweet, satisfying crunch.
- Water: This helps dissolve the sugar and creates the syrupy goodness needed for your geodes.
- Light corn syrup: This ingredient adds shine and prevents the sugar from crystallizing too quickly, ensuring a smooth texture.
- Flavored extract: Choose from vanilla, raspberry, or cotton candy to add a burst of flavor. Feel free to experiment with your favorites!
- Gel food coloring: This is where the magic happens! Use vibrant colors like purple, pink, or blue to make your geodes pop.
- Edible glitter or luster dust: For that extra sparkle, brush this on your finished geodes to mimic the shimmer of real gemstones.
- Granulated sugar crystals: These are sprinkled inside the molds to create the geode “sparkle” effect, making your candies look even more stunning.
For exact measurements, check the bottom of the article where you can find everything listed for easy printing. Remember, the beauty of DIY Candy Geodes lies in your creativity, so don’t hesitate to mix and match flavors and colors!

How to Make DIY Candy Geodes
Prepare Molds
Start by preparing your molds. You can use small bowls or silicone molds, lining them with parchment paper for easy removal. If you want a more authentic geode look, consider using cleaned eggshell halves. Just make sure they’re well-oiled to prevent sticking. This step is crucial for a smooth finish!
Make Sugar Syrup
Now, let’s make the sugar syrup! In a heavy saucepan, combine granulated sugar, water, and light corn syrup. Stir the mixture over medium heat until the sugar dissolves completely. Once dissolved, increase the heat and bring it to a boil. Don’t stir it now! You want to reach the hard crack stage, which is 300°F on a candy thermometer. This is where the magic happens, transforming your mixture into a candy masterpiece!
Add Flavor & Color
Once your syrup reaches the right temperature, remove it from the heat. Carefully stir in your chosen flavored extract, like vanilla or raspberry, for a delicious twist. Then, add gel food coloring to create vibrant hues. This is your chance to get creative and make your DIY Candy Geodes truly unique!
Form the Geodes
Next, it’s time to form the geodes! Pour the hot syrup into your prepared molds, filling them halfway. Immediately sprinkle the inside with granulated sugar crystals to mimic the sparkling effect of real geodes. For a fun twist, drizzle different colors of syrup into the same mold to create beautiful swirls. This step is where your candy starts to take shape, so have fun with it!
Cool & Set
Let your candy geodes cool completely, which should take about an hour. Once they’re hardened, gently remove them from the molds. If you used eggshells, tap them lightly to crack the shell and reveal your stunning geodes. This moment is always so rewarding!
Finish with Shimmer
To give your geodes that extra sparkle, brush them with edible glitter or luster dust. This final touch will make them shine like real gemstones! Your DIY Candy Geodes are now ready to impress everyone with their beauty and taste!
Tips for Success
- Always use a candy thermometer to ensure your syrup reaches the hard crack stage.
- Be cautious when handling hot syrup; it can cause burns.
- Experiment with different flavor combinations and colors for unique geodes.
- Store your finished geodes in an airtight container to keep them fresh.
- Have fun with the process! Let your creativity shine through.
Equipment Needed
- Heavy saucepan: A sturdy pot is essential for boiling the sugar syrup. A non-stick option works well too.
- Candy thermometer: This tool ensures your syrup reaches the perfect temperature. If you don’t have one, a regular kitchen thermometer can suffice.
- Molds: Use silicone molds or small bowls. Cleaned eggshell halves add a fun twist!
- Spatula: A heat-resistant spatula helps with stirring and pouring.
Variations
- Flavor Infusions: Try using different flavored extracts like almond, coconut, or even mint for a unique twist on your geodes.
- Color Combinations: Mix and match gel food colors to create ombre effects or rainbow swirls for a vibrant display.
- Dietary Adjustments: For a vegan version, substitute light corn syrup with agave syrup or maple syrup.
- Healthier Options: Use natural sweeteners like honey or stevia, but keep in mind that the texture may vary.
- Seasonal Themes: Incorporate seasonal flavors like pumpkin spice in the fall or peppermint during the holidays for festive geodes.
Serving Suggestions
- Pair your DIY Candy Geodes with a scoop of vanilla ice cream for a delightful dessert.
- Serve them on a decorative platter, surrounded by fresh fruits for a colorful display.
- For a fun party treat, use them as cake toppers or in dessert tables.
- Enjoy with a refreshing fruit punch or sparkling lemonade for a festive touch.
FAQs about DIY Candy Geodes
Can I use different molds for my DIY Candy Geodes?
Absolutely! You can get creative with your molds. Silicone molds, small bowls, or even cleaned eggshells work wonderfully. Just ensure they’re well-oiled or lined to prevent sticking.
How long do DIY Candy Geodes last?
When stored in an airtight container, your DIY Candy Geodes can last for about two weeks. Just keep them away from humidity to maintain their texture and sparkle!
Can I make these geodes without a candy thermometer?
While a candy thermometer is highly recommended for accuracy, you can use the cold water test as an alternative. Drop a small amount of syrup into cold water; if it forms a hard ball, you’re good to go!
What flavors work best for DIY Candy Geodes?
The sky’s the limit! Popular choices include vanilla, raspberry, and cotton candy. Feel free to experiment with other flavors like almond or mint for a unique twist!
Can I add more colors to my DIY Candy Geodes?
Definitely! You can swirl different colors of syrup together in the molds for a stunning multicolor effect. Just be careful not to overmix, or you’ll end up with a muddy hue!
Final Thoughts
Creating DIY Candy Geodes is more than just a fun kitchen project; it’s a delightful journey into the world of edible art! The joy of watching your colorful creations come to life is truly magical. Each geode sparkles with personality, reflecting your unique style and creativity. Whether you’re sharing them with friends or enjoying them yourself, these treats are bound to bring smiles and sweet memories. So, roll up your sleeves, gather your ingredients, and let the candy-making adventure begin! You’ll be amazed at what you can create with just a little sugar and a lot of imagination!
Print
DIY Candy Geodes: Create Sparkling Treats at Home!
- Total Time: 1 hour 45 minutes
- Yield: Approximately 12 geodes 1x
- Diet: Vegetarian
Description
Create your own sparkling candy geodes at home with this fun and easy DIY recipe!
Ingredients
- 3 cups granulated sugar
- 1 cup water
- 1 cup light corn syrup
- 1 tsp flavored extract (vanilla, raspberry, or cotton candy)
- Gel food coloring (purple, pink, blue, etc.)
- Edible glitter or luster dust (for shimmer)
- Granulated sugar crystals (for the geode “sparkle”)
Instructions
- Prepare molds: Line small bowls or silicone molds with parchment paper or lightly oil them. Alternatively, use cleaned eggshell halves for a more realistic geode effect.
- Make sugar syrup: In a heavy saucepan, combine sugar, water, and corn syrup. Stir over medium heat until sugar dissolves. Increase heat and bring to a boil without stirring until the mixture reaches 300°F (hard crack stage) on a candy thermometer.
- Add flavor & color: Remove from heat and carefully stir in flavored extract and gel food coloring.
- Form the geodes: Pour hot syrup into prepared molds or shells, filling halfway. Immediately sprinkle the inside with granulated sugar crystals to mimic geode sparkle. For a multicolor effect, drizzle different shades of syrup into the same mold for swirls.
- Cool & set: Let candies cool completely (about 1 hour). Once hardened, gently remove from molds.
- Finish with shimmer: Brush edible glitter or luster dust onto the crystals for a gemstone shine.
Notes
- Ensure the syrup reaches the correct temperature for the best texture.
- Experiment with different colors and flavors for unique geodes.
- Store finished geodes in an airtight container to maintain their texture.
- Prep Time: 15 minutes
- Cook Time: 30 minutes
- Category: Candy
- Method: Boiling
- Cuisine: American
Nutrition
- Serving Size: 1 geode
- Calories: 150
- Sugar: 35g
- Sodium: 5mg
- Fat: 0g
- Saturated Fat: 0g
- Unsaturated Fat: 0g
- Trans Fat: 0g
- Carbohydrates: 38g
- Fiber: 0g
- Protein: 0g
- Cholesterol: 0mg


