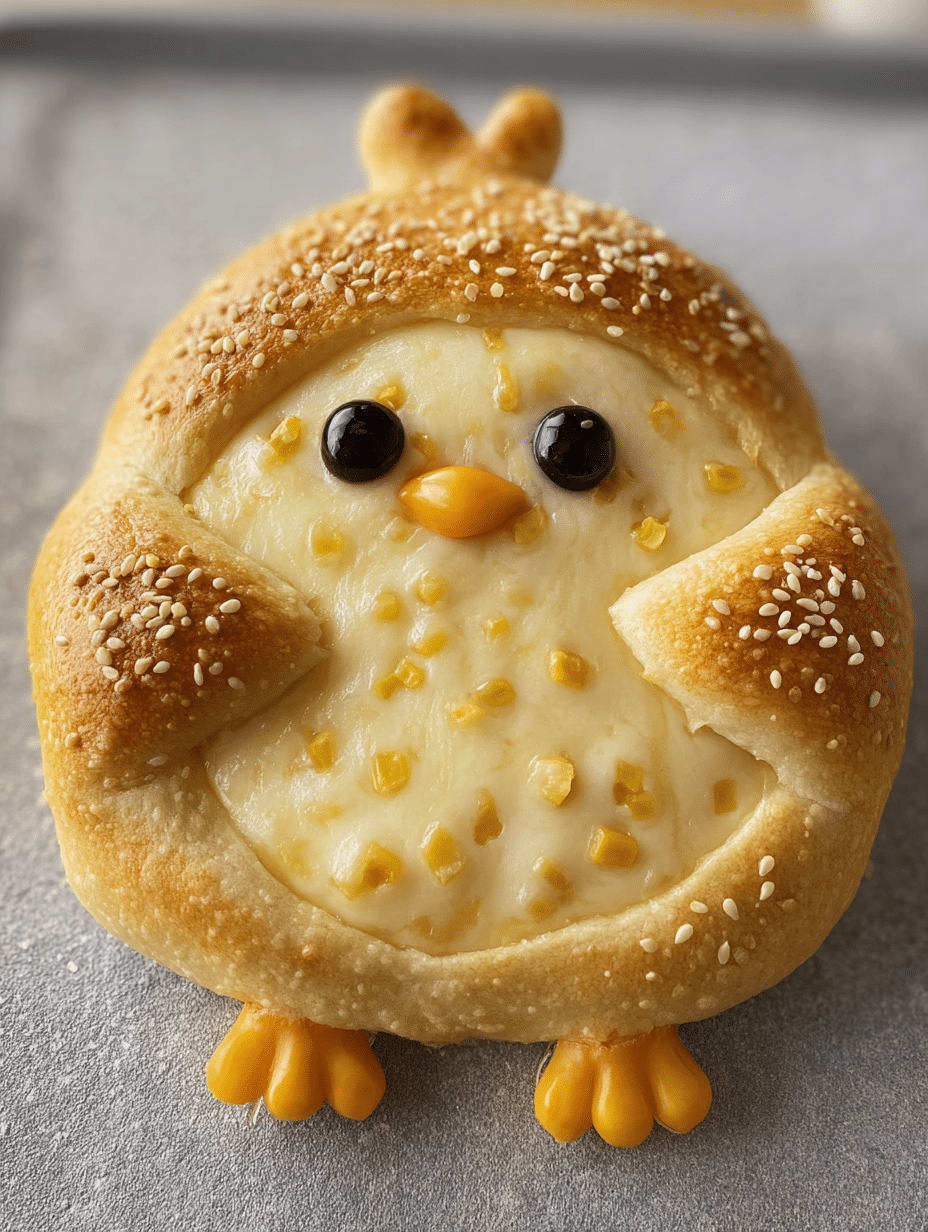
Introduction to Cheesy Corn Bread Chick
Hey there, fellow food lovers! If you’re looking for a fun and delicious recipe, let me introduce you to my Cheesy Corn Bread Chick. This delightful dish is not just a treat for the taste buds; it’s also a feast for the eyes! Perfect for a quick solution on a busy day or a charming centerpiece for your next gathering, these little chicks are sure to impress your loved ones. With gooey cheese and sweet corn wrapped in soft, fluffy bread, it’s a recipe that brings joy to the kitchen and smiles to the table.
Why You’ll Love This Cheesy Corn Bread Chick
This Cheesy Corn Bread Chick is a delightful blend of flavors and textures that will make your taste buds dance! It’s incredibly easy to whip up, making it perfect for busy weeknights or spontaneous gatherings. Plus, the cheesy filling is a crowd-pleaser, especially for kids and picky eaters. With just a few simple ingredients, you can create a dish that’s not only tasty but also visually adorable!
Ingredients for Cheesy Corn Bread Chick
Gathering the right ingredients is the first step to creating your Cheesy Corn Bread Chick. Here’s what you’ll need:
- All-purpose flour: The backbone of your dough, providing structure and texture.
- Salt: Enhances flavor and balances the sweetness of the corn.
- Sugar: Adds a hint of sweetness to the dough, making it irresistible.
- Instant yeast: Helps the dough rise quickly, giving it that fluffy texture.
- Warm milk: Activates the yeast and adds moisture to the dough.
- Egg: Binds the ingredients together and adds richness.
- Unsalted butter: Provides a rich flavor and tender crumb.
- Mozzarella cheese: The star of the filling, offering gooey, melty goodness.
- Cream cheese: Adds creaminess and a slight tang to the filling.
- Canned sweet corn: Brings a burst of sweetness and texture to the mix.
- Mayonnaise: Helps create a creamy filling that holds everything together.
- Black olives or chocolate chips: Perfect for creating cute little eyes on your chicks.
- Carrot or cheese: Use these for the beak and feet, adding a fun touch.
- Sesame seeds: A delightful topping that adds crunch and visual appeal.
Feel free to customize your filling with other cheeses or veggies based on your preferences. You can find the exact measurements for each ingredient at the bottom of the article, ready for printing!
How to Make Cheesy Corn Bread Chick
Now that you have all your ingredients ready, let’s dive into the fun part—making your Cheesy Corn Bread Chick! This process is straightforward and enjoyable, perfect for both seasoned cooks and beginners. Follow these steps, and you’ll have adorable little chicks ready to impress!
Step 1: Make the Dough
Start by mixing warm milk, sugar, and instant yeast in a bowl. Let it sit for about 5 minutes until it becomes foamy. This step is crucial as it activates the yeast, giving your dough that lovely rise.
Next, add the all-purpose flour, salt, egg, and softened butter to the yeast mixture. Now, it’s time to knead! I usually do this for about 8 to 10 minutes until the dough is smooth and elastic. If it feels too sticky, sprinkle a little more flour. Once done, cover the bowl with a clean cloth and let it rise for 1 to 1.5 hours, or until it doubles in size. This is the perfect time to sip on some tea and enjoy the delightful aroma of baking!
Step 2: Prepare the Filling
While the dough is rising, let’s whip up that creamy filling! In a separate bowl, combine the shredded mozzarella, softened cream cheese, drained sweet corn, mayonnaise, sugar, salt, and black pepper. Mix everything until it’s nice and creamy. This filling is where the magic happens, so don’t be shy—taste it and adjust the seasoning if needed. You can even add some herbs for an extra kick!
Step 3: Shape the Chicks
Once your dough has risen, punch it down gently to release the air. Divide the dough into four equal portions. Take one piece and flatten it slightly. Now, fill it with 2 to 3 tablespoons of that cheesy corn filling. Seal the edges tightly and shape it into a round ball. This is where your creativity shines!
To make the chicks look adorable, use small pieces of dough to form wings and attach them to the sides. For the “ears” or tufts, shape tiny dough balls and place them on top. Place your shaped chicks on a lined baking tray, and repeat with the remaining dough. They’re starting to look like little chicks already!
Step 4: Decorate & Bake
Now for the finishing touches! Brush the tops of your chicks with the egg wash made from the egg yolk and milk. This gives them a beautiful golden color when baked. Sprinkle sesame seeds on the “head” area for added crunch and charm.
Preheat your oven to 180°C (350°F) and bake the chicks for 15 to 18 minutes, or until they’re golden brown. The aroma wafting through your kitchen will be irresistible! Once baked, let them cool slightly before decorating with black olives or chocolate chips for eyes and carrot or cheese pieces for the beak and feet. Your Cheesy Corn Bread Chicks are now ready to steal the show!
Tips for Success
- Make sure your milk is warm, not hot, to properly activate the yeast.
- Don’t rush the rising time; it’s key for fluffy dough.
- Feel free to experiment with different cheeses or add herbs to the filling.
- Use a kitchen scale for precise measurements if you have one.
- For extra fun, let kids help shape and decorate the chicks!
Equipment Needed
- Mixing bowl: A large bowl for combining ingredients. A pot can work in a pinch.
- Measuring cups and spoons: Essential for accuracy. Use a kitchen scale if you prefer.
- Rolling pin: For flattening dough. A wine bottle can serve as a substitute.
- Baking tray: A lined tray for baking. Any oven-safe dish will do.
- Pastry brush: For egg wash. A clean paintbrush can be an alternative.
Variations
- Spicy Kick: Add diced jalapeños or a sprinkle of cayenne pepper to the filling for a spicy twist.
- Herb Infusion: Mix in fresh herbs like chives, parsley, or dill to elevate the flavor profile.
- Gluten-Free Option: Substitute all-purpose flour with a gluten-free blend for a gluten-free version.
- Vegan Delight: Use plant-based cheese and a flax egg instead of regular egg and dairy for a vegan-friendly treat.
- Veggie Boost: Incorporate finely chopped bell peppers, spinach, or zucchini into the filling for added nutrition.
Serving Suggestions
- Pair your Cheesy Corn Bread Chicks with a fresh garden salad for a light meal.
- Serve with a side of creamy ranch or spicy dipping sauce for extra flavor.
- For drinks, consider a chilled lemonade or iced tea to complement the dish.
- Present them on a colorful platter for a festive touch at gatherings.
FAQs about Cheesy Corn Bread Chick
Can I make Cheesy Corn Bread Chicks ahead of time?
Absolutely! You can prepare the dough and filling in advance. Shape the chicks and freeze them before baking. When you’re ready, just pop them in the oven straight from the freezer, adding a few extra minutes to the baking time.
What can I use instead of mozzarella cheese?
If mozzarella isn’t your favorite, feel free to swap it out for cheddar, gouda, or even pepper jack for a spicy kick. The filling will still be creamy and delicious!
How do I store leftovers?
Store any leftover Cheesy Corn Bread Chicks in an airtight container in the fridge for up to three days. You can reheat them in the oven for a few minutes to regain that fresh-baked taste.
Can I customize the filling?
Definitely! The filling is versatile. You can add cooked bacon, sautéed vegetables, or even different spices to make it your own. Get creative!
Are Cheesy Corn Bread Chicks suitable for kids?
Yes! These adorable chicks are perfect for kids. They’re fun to make and eat, plus the cheesy filling is usually a hit with picky eaters. Let the little ones help shape and decorate them for added fun!
Final Thoughts
Making Cheesy Corn Bread Chicks is more than just a cooking project; it’s a delightful experience that brings joy to the kitchen. The laughter shared while shaping these adorable little chicks is priceless. Each bite is a warm hug, filled with cheesy goodness and sweet corn. Whether you’re impressing guests or enjoying a cozy family meal, these chicks are sure to brighten your day. So roll up your sleeves, gather your loved ones, and dive into this fun recipe. Trust me, the smiles and satisfaction will be worth every moment spent in the kitchen!
Print
Cheesy Corn Bread Chick: A Fun Recipe to Try Today
- Total Time: 1 hour 48 minutes
- Yield: 4 chicks 1x
- Diet: Vegetarian
Description
A fun and delicious recipe for Cheesy Corn Bread Chicks that are perfect for any occasion.
Ingredients
- 300 g (2 ½ cups) all-purpose flour
- 5 g (1 tsp) salt
- 30 g (2 tbsp) sugar
- 5 g (1 tsp) instant yeast
- 160 ml (⅔ cup) warm milk
- 1 egg
- 30 g (2 tbsp) unsalted butter, softened
- 200 g mozzarella cheese (shredded)
- 100 g cream cheese (softened)
- 80 g canned sweet corn kernels (drained)
- 1 tbsp mayonnaise
- ½ tsp sugar
- Pinch of salt & black pepper
- 1 egg yolk + 1 tbsp milk (egg wash)
- Sesame seeds (for topping)
- Black olives or chocolate chips (for eyes)
- Small piece of carrot or cheese (for beak & feet)
Instructions
- Make the Dough: In a bowl, mix warm milk, sugar, and yeast. Let it sit for 5 minutes until foamy. Add flour, salt, egg, and butter. Knead until smooth and elastic (8–10 minutes). Cover and let rise for 1–1.5 hours, or until doubled in size.
- Prepare the Filling: In a bowl, combine mozzarella, cream cheese, corn, mayonnaise, sugar, salt, and pepper. Mix well until creamy and set aside.
- Shape the Chicks: Divide dough into 4 equal portions. Take one piece, flatten slightly, and fill with 2–3 tbsp of cheesy corn filling. Seal tightly and shape into a round ball. Use small pieces of dough to form wings and attach them on the sides. Shape small dough balls for the “ears/tufts” and attach on top. Place shaped chicks on a lined baking tray.
- Decorate & Bake: Brush with egg wash and sprinkle sesame seeds on the “head” area. Bake in preheated oven at 180°C (350°F) for 15–18 minutes until golden. Once baked, decorate with olive/chocolate chip eyes and carrot/cheese for beak and feet.
Notes
- Ensure the milk is warm, not hot, to activate the yeast.
- You can customize the filling with other cheeses or vegetables.
- These can be made ahead of time and frozen before baking.
- Prep Time: 30 minutes
- Cook Time: 18 minutes
- Category: Baking
- Method: Baking
- Cuisine: American
Nutrition
- Serving Size: 1 chick
- Calories: 250
- Sugar: 3 g
- Sodium: 300 mg
- Fat: 10 g
- Saturated Fat: 5 g
- Unsaturated Fat: 3 g
- Trans Fat: 0 g
- Carbohydrates: 30 g
- Fiber: 1 g
- Protein: 8 g
- Cholesterol: 40 mg


